Sunday, October 30, 2011

Chicken Marbella


Chicken is that ubiquitous ingredient that shows up every week and usually fails to inspire.  It is a go-to staple when I am shopping because it is an easy sell with the kids and is a versatile ingredient for any number of recipes. 
But it is often a big bore. I am seldom truly excited at the thought of chicken for dinner.  It is a good comfort food but I never order it when I go out.  It just seems too mundane and I always want something special when I go out for a meal. It's like a guest that keeps showing up, with nothing new to say and never knowing that they have overstayed their welcome. Honestly, chicken it is time you came up with a better story.


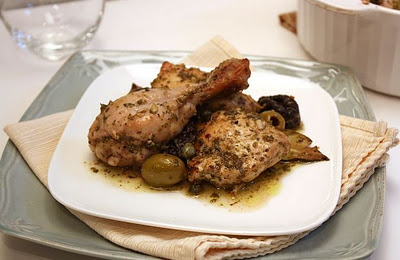
Well, this week, it did. This week, chicken transformed itself into Chicken Marbella, a flavourful, unique and completely unexpected performance from my boring old friend.  Chicken finally went out and bought itself a new dress and got it's hair done.
This is the classic recipe from the Silver Palette Cookbook.  I found it, as I do so many recipes, while surfing the Internet. I read the ingredient list and thought "what a completely odd and (I hate to say it) kind of off-putting combination of flavours". Chicken, prunes, olives, capers, white wine, brown sugar???? Well, curiosity got the better of me and I tried it. 
What can I say, it is absolutely delicious. The sauce is complex and sophisticated. A combination of heady sweetness from the dried prunes with the sour and bitter flavours of the green olives and capers. In a word, it is sublime. And better still, it is so easy to make.  Chicken pieces are marinated overnight and then baked. This is a "wow" dinner party meal with very little prep or effort.  I think I just got excited about chicken!


Chicken Marbella
This recipe had been adapted from The Silver Palette Cookbook.

Prep time: 12 hours
Cook time: 1 hour
Total time: 1 day
Yield: 10 - 12

Ingredients
  • 4 chickens, skinned and quartered
  • 1 whole head of garlic, peeled and minced
  • 1/4 cup dried oregano
  • 1/2 cup red wine vinegar
  • 1/2 cup olive oil
  • 1 1/2 cup pitted prunes
  • 1 1/2 cup large green olives
  • 250ml jar of capers with the juice
  • 1 cup white wine
  • 1 cup brown sugar
  • 1 teaspoon salt
  • 1/2 teaspoon fresh ground black pepper
  • chopped fresh parsley

Cooking Directions
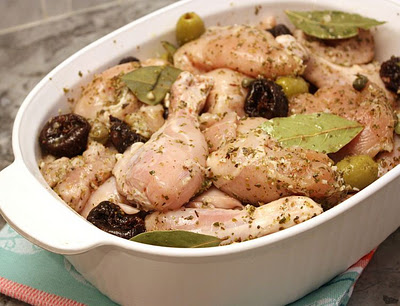
  1. In a large oven safe baking dish combine the chicken, garlic, oregano, prunes, olives, capers with their juice, wine vinegar, olive oil, bay leaves and salt and pepper. Stir to coat the chicken. Cover and refrigerate overnight.
  2. When ready to cook, preheat oven to 350 degrees.
  3. In the same baking dish, sprinkle the brown sugar over the chicken and marinade. Pour the white wine over it.
  4. Bake in the centre of the oven for 1 to 11/2 hours, basting the chicken frequently with the marinade. Chicken is done when the breast and thigh juices run clear when poked with a knife at the thickest part.
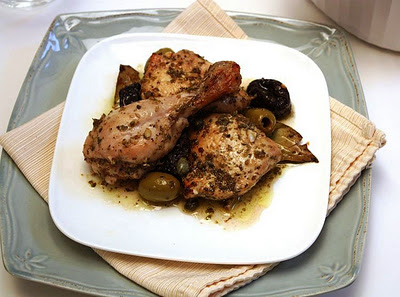
  5. Remove from the oven. Sprinkle with parsley. Can be eaten hot or cold. Serve the chicken with a bit of the marinade and some of the prunes, olives and capers. Enjoy!


Tuesday, October 25, 2011

Halloween Gingerbread Cookies


I have very fond childhood memories of Halloween.  Nothing, save Christmas morning, could compare with the excitement of Halloween night. Rushing home from school, carving the pumpkin, a quick dinner then getting outfitted in my costume and heading out collection bag (and UNICEF box) in hand.

I loved dressing-up and pretending I was someone else. I loved the excitement, the thrill of being out in the night, in the dark.  My mother was a big believer in the do-it-yourself costume which, I think, added a lot to the experience. I could become anyone with a little imagination and a few carefully chosen odds and ends. I vividly remember putting together an endless number of costumes from old clothes, sheets, make-up and whatever else I could find around the house.

 As an adult, however, Halloween became less important. It was just another day. Then...I had kids of my own and now, happily, the excitement is back.  We are putting together costumes, decorating the house, picking out pumpkins and generally immersing ourselves in the thrill of Halloween night.


So when I discovered that my children's new school has an annual Fright Night Fundraiser, I was determined to get right in there and help with this year's event. Which meant, of course, that I would bust my butt making a ton of cookies for the Witches' Kitchen Bake Sale ( i.e. 6 dozen Halloween themed Gingerbread Cookies!)

My husband's great mantra for me is always, "don't overdo it!". Unfortunately, I never listen.  At 7:00am the morning of the event I am donning my apron (I want the cookies to be as fresh as possible) and by 2:00pm my hand has cramped up, I am swearing like a sailor (...in my head) and laying cookies out to dry...with 3 hours to spare.  GD! why do I do that to myself. 

Oh well, it was good fun and the kids were "bouncing off the wall" excited by the time we were getting into our costumes and heading over to the school and the cookies sold like hotcakes.

Phew, we haven't even made it to Halloween yet! I've got to pace myself.


Gingerbread Cookies
This is my Grandfather's recipe and it is a staple in our house around the Holidays.  It makes a nice mild gingerbread and, though I am biased, I think it is the best Gingerbread Cookie recipe I have ever tasted!

Prep time: 15 minutes
Cook time: 10 minutes
Total time: 25 minutes
Yield: 3 dozen

Ingredients
  • 1 tablespoon molasses
  • 1 cup brown sugar
  • 1/2 cup granulated sugar
  • 1/4 teaspoon salt
  • 1/4 teaspoon ground cloves
  • 2 teaspoons ground ginger
  • 2 teaspoons cinnamon
  • 1/2 teaspoon allspice
  • 1 teaspoon baking soda
  • 1/2 cup butter
  • 2 eggs
  • 2 cups all purpose flour, plus more for rolling

Cooking Directions
  1. Preheat the oven to 350 degrees.
  2. Using a stand mixer (with the paddle attachment) or hand mixer, cream together the sugars, molasses and butter, about 1 -2 minutes. Add the eggs, one at a time, and mix just until incorporated.
  3. In a separate small bowl whisk together the dry ingredients until combined. Add the mixed dry ingredients to the butter, egg and sugar mixture. Beat until all ingredients are incorporated and come together into a stiff cookie dough.
  4. Taking about half of the cookie dough at a time, roll out to 1/4 inch thickness on a well floured surface.
  5. Initially the dough is very sticky and soft so you will have to add a generous amount of flour to keep it from sticking to your surface. However, this dough is very forgiving and the cookies will not suffer from the addition of a little extra flour.
  6. Cut the dough into desired shapes with your cookie cutters and transfer to a cookie sheet lined with greased parchment paper or a Silpat sheet. Continue until all of the dough has been cut out into shapes.
  7. Bake in the centre of the oven for 8-10 minutes or just until golden brown.
  8. Transfer cookies to a cooling rack. Wait until the cookies are completely cool before icing. Decorate with Royal Icing. Enjoy!

Royal Icing

Ingredients
  • 2 egg whites (if your do not like using raw eggs you can use meringue powder)
  • 2 cups icing sugar
  • pinch salt
  • food colouring

Directions
  1. Whisk the egg whites, icing sugar and salt together in a small bowl. The mixture should be smooth and thick but still loose enough that it will flow through an icing tip.
  2. Separate into a couple of bowls (depending on how many colours you want to use) and add your food colouring.
  3. Decorate cookies as desired. You can use a pastry bag with a writing tip or a small zip lock bag (with a very small hole cut in one corner) to make thin outlines similar to the ones pictured above.

Sunday, October 23, 2011

Shepherd's Pie


Hi there and greetings from Hamilton, Ontario.  Long time no see (hear?...write?), whatever it has been a while.

Way back in, God when was it... March, I published a lovely recipe about Apple Butter and then, well, things kind of turned up side down. First, my husband got a new job in the Hamilton area, which was great news but soon became a logistical nightmare for our family.  With the amount of travel required for my job and now a 2 hour commute to and from work for him life became stressful to say the least.  Coordinating dropping off, picking up, feeding and caring for children took a village, literally, and many undying thanks to all of the friends, neighbors and family members who pitched in and helped.

So, quickly determining this could not continue, we made the decision that I would quit my job (yeah), leave the city that I have lived in almost my whole life and LOVE (boo), and find a home closer to my husband's work.

Leaving work was not a hard decision.  I hated the travel and am not overly fond of the values of the retail industry. Leaving the city was another matter.  True, we have not moved that far, but for a life long city dweller and urbanite I can tell you that it has been quite an adjustment.

The good news is that I have more time to spend with my family and I have discovered very quickly that I love Hamilton. We found a neighborhood very much like where we lived in Toronto.  The pace of life is much kinder, the people we have met are very warm and welcoming and the cost of real estate is heaven compared to Toronto. Now, if I could find a good latte we would be all set!


So now here I am (okay, took me a little longer to adjust than I anticipated) back at it and excited to be starting fresh in a new home, (with a fabulous big kitchen I might add), in a new city.  And best of all I will now get to explore all of the wonderful local eateries, farmer's markets and food retailers. In fact, a trip to Fenwood Farm provided me with the ground beef I used in this recipe.  We always bought our organic chickens from Fenwood Farms through our local butcher in Toronto, now we are just minutes away from the farm itself!  Living out hear definitely has its advantages.

Having said all of that, let's get to why we are here...the recipe.  I decided to start back with some comfort food: Shepherd's Pie.  This is a great simple meal for a cool autumn night.  It is very adaptable to individual tastes and is also a great "use up what I have in my fridge" kind of recipe.


Shepherd's Pie

Prep time: 25 minutes
Cook time: 25-30 minutes
Total time: 1 hour
Yield: serves 6

Ingredients
  • 1 pound ground lamb
  • 1/2 pound ground beef
  • 1 medium onion
  • 1 large carrot, diced
  • 2 stalks celery, diced
  • 2 cloves garlic, minced
  • 2 teaspoons fresh rosemary, minced
  • 2 teaspoons fresh thyme, minced
  • 1 tablespoonWorcestershire sauce
  • 1 tablespoon olive oil
  • 1/4 cup water
  • 1 small boiled potato, mashed
  • 1 cup fresh or frozen peas
  • 1 teaspoon salt
  • 1/2 teaspoon pepper
  • Garlic Mashed Potato Topping

Cooking Directions
  1. Preheat the oven to 350 degrees.
  2. Over medium heat, brown the ground lamb and beef in a large saute pan with the tablespoon of olive oil. Add the onion, garlic, carrot, celery and chopped herbs. Saute 5 to 10 minutes until the vegetables are beginning to soften. Stir in the salt and pepper, Worcestershire sauce, mashed potato and the 1/4 cup of water. Simmer over low heat until the water is absorbed. The potato will help to thicken the mixture so that it does not fall apart when you are serving. Stir in the cup of peas and season to taste, adding more salt or pepper if you desire.
  3. Transfer the meat mixture to an oven safe casserole dish. Top with the Garlic Mashed Potato Topping (recipe follows). Create a rough texture with the topping so that it browns while in the oven. Bake for 25-30 minutes, or just until the meat mixture is bubbling and the topping has browned. Serve and enjoy.


Garlic Mashed Potato Topping
These are great on their own with a roast chicken or stew!

Prep time: 10 minutes
Cook time: 20 minutes
Total time: 30 minutes
Yield: 6 servings

Ingredients
  • 8 medium Yukon Gold or other golden flesh potatoes
  • 4 cloves garlic, peeled
  • 1/4 cup butter
  • 1/4 cup milk
  • 1/4 cup grated Parmesan or Cheddar cheese
  • 1 tablespoon sugar
  • 1 1/2 teaspoon salt
  • 1/2 teaspoon pepper
Cooking Directions
  1. Peel potatoes and chop into large pieces. Place potatoes and peeled garlic cloves in a medium sized saucepan and add enough water to cover.
  2. Boil 20 - 25 minutes (while you are sauteing the meat and vegetables for the filling) until the potatoes are fork tender (meaning a fork or knife slides easily into the potato when you test it).
  3. Drain the water from the saucepan and add the remaining ingredients. Mash together with a potato masher until the mixture comes together and is smooth. You can whip with a whisk or give it a whiz in the food processor if you want the potatoes really smooth, I don't bother.
  4. Taste and season further with salt and pepper if desired.
  5. Spoon the topping over the meat filling in the casserole dish and "rough up" the top with a fork so that it will drown nicely.

Monday, October 17, 2011

Feast For the Fight


I was recently contacted by Liz at the Canadian Cancer Society with information regarding a fantastic event which is happening in restaurants around Toronto this Wednesday October 19, 2011.  This annual event is called the Feast for the Fight. Participating restaurants will donate a portion of their sales on that day to the Canadian Cancer Society in support of it's mission to eradicate cancer and enhance the quality of life of Canadians living with cancer. 

I cannot think of a better reason to go out and enjoy a meal, expecially as participating restaurants include the likes of Le Petit Castor, Wildfire Steakhouse & Wine Bar, The Queen Mother, The Rebel House, La Passione, Bedford Academy, Il Posto and many more.


For more information please go to feastforthefight.ca and if you are interested in finding out more about the Canadian Cancer Society please visit fightback.ca

Stay tuned, as I will be keeping this post up until Wednesday the 19th and then I will be back with more delicious recipes and an update on what the heck I have been doing. (hint...no longer living in Toronto!)
Related Posts Plugin for WordPress, Blogger...