Monday, March 29, 2010

Chocolate Cake


We love our desserts around here. You can tell this from the previous posts about chocolate chip cookies, chocolate sandwich cookies, plum tarts, brownies, blueberry muffins, and Darby cakes….and I have only been posting for about 2 months. We are definitely addicted to the sweet stuff. I have talked a lot already about what makes a good cookie or the bliss of a perfect brownie, but up until this point I have not included a single cake recipe and I thought that oversight needed to be corrected immediately.

So brace yourself, I am going to wax poetic about cakes.


I have a cookbook in my collection that includes a chapter called A Cake is a Miracle Thing, and I agree. There is something miraculous about a cake. It always seems like a kind of alchemy to me, to take flour, eggs, sugar and butter and end up with something both airy and moist. And I love the ritual of making a cake, the procedure that generally does not change, despite the multitude of ingredient possibilities…cream butter and sugar, add eggs, alternate dry and wet ingredients.

When my mother was growing up Thursday was cake day because that was the day my Grandfather made cakes for the shop. He would always bring one home for dinner and it was a big treat every week. And that is the other thing I love about cakes, no matter how often you have one, they still seem like a treat.


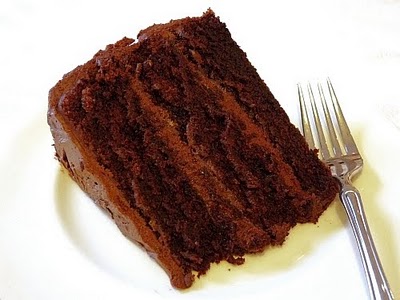
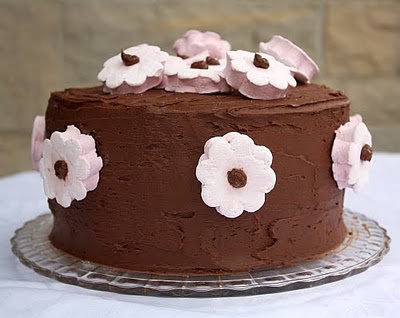
I have been on a quest for a long time to find the perfect chocolate cake recipe. I find chocolate cakes are particularly prone to being dry so I have spent a ridiculous amount of time finding one that consistently turns out moist. For awhile I was using the recipe from The Barefoot Contessa Cookbook, which is an excellent cake. Then last Christmas I made the Hot Chocolate Layer Cake recipe out of the Dec 2009/Jan2010 issue of Fine Cooking, and it was THE ONE.  A great cake..dense and moist but still somehow light and airy with an intense chocolate flavour.  I topped the cake with homemade Cherry Marshmallows that I cut into daisy shapes. I will be featuring that recipe in a later post.


Hot Chocolate Layer Cake
adapted from the Dec 2009/Jan 2010 issue of Fine Cooking Magazine
Despite what I said above about cakes following a standard procedure, this recipe is the exception to the rule.  Read through the entire recipe and follow as directed for the best results.


3/4 cup unsalted butter
3 cups unbleached all-purpose flour
3/4 cup neutral tasting oil, such as vegetable or canola
4-1/2 oz. bittersweet chocolate, chopped
1 cup water
3 cups sugar
3/4 cup unsweetened cocoa powder
3 large eggs, at room temperature
3/4 cup buttermilk, at room temperature
2 tablespoons pure vanilla extract
2-1/2 teaspoon baking soda
1/2 teaspoon salt

Preheat the oven to 350 degrees. Position your oven racks to the middle of the oven.  You will need to get two racks as close to the middle as possible, but still leave room for the cake to rise without coming in contact with the rack above. Butter three 9 inch round cake pans and line each with parchment paper. Then butter and flour the parchment and sides of the pan, removing any excess flour.

Combine oil, butter, chopped chocolate, and 1 cup water in a large saucepan. Heat over low heat until melted and combined.
Whisk the sugar, flour and cocoa powder together in a separate large bowl. Pour the hot chocolate mixture into the flour and sugar mixture and whisk until combined.
Whisk in the eggs, one at a time, then the buttermilk, vanilla, baking soda, and salt. Divide the finished batter evenly among the three prepared pans.
Place two pans on the top rack and the third on the lower rack of your oven. Stagger the pans so that they are not directly over each other. Bake 35 to 40 minutes. To ensure even baking, at the 20 minute point swap the pans so that the one on the lower rack is now in the upper rack. Cakes are done when they spring back when touched lightly in the centre or when a toothpick inserted near the centre comes out clean.  Cool on racks for 10 minutes and then remove from pans by inverting the cakes and removing the parchment paper. Cool completely on the cooling racks before icing your cakes.

Chocolate Buttercream Frosting
I did not use the frosting recipe from Fine Cooking for my cake.  I found it very involved and I like the basic buttercream as I feel it balances the richness of the cake.  If you want the original frosting recipe or the marshmallow follow the Fine Cooking link in the post above.

1 cup room temperature butter
3/4 cup unsweetened cocoa powder
1 teaspoon vanilla extract
4 cups icing sugar
3-4 tablespoons milk

Using a hand beater or stand mixer, at low speed, cream together butter, cocoa powder, vanilla extract and icing sugar. The mixture will be stiff and dry and this point.  Continuing at low speed add milk a tablespoon at a time until the frosting reaches the desired consistency.  Turn your mixer onto high speed to make the frosting light and fluffy.  Spread immediately between the layers and on top and sides of cake.


Wednesday, March 24, 2010

Udon Noodle Soup


A few weeks ago I made Udon Noodle Soup for dinner. It is one of my weeknight go to recipes because it is quick and always a hit with my family. My 4 year old loves to use chopsticks, and she is surprisingly good at it. My 2 year old just loves all the noodles. I, on the other hand, love watching them eat something filled with vegetables, mushrooms, ginger and tofu with abandon. It makes me feel quite proud of them and their willingness to experience new and different tastes.


Every time I make noodle soup like this I can’t help but think about the movie Tampopo. If you have never seen it, you must. It is the story of a woman on a quest to make the perfect noodle soup. It’s quirky and funny and one of the best food movies I have ever seen. I saw it over 15 years ago and it has stuck with me all this time. I remember coming out of the theatre and wanting noodle soup so bad I had to go and find some immediately.


Now every time I make this soup I wonder if it would measure up to the soup that Tampopo, the movie’s heroine, finally learns to make. I doubt it does, but in the end it doesn’t really matter, because this movie is about exactly what I myself strive for when I cook. It’s about the enjoyment of food and the adventure of eating. I think that is the reason it has stuck with me all these years and somehow, that fits neatly with the image of my two young daughters slurping up bowls of udon noodles.


Udon Noodle Soup

This is one of those recipes I vary to suit my mood. I will list what I made in the photos above and include recipe variations.

6 cups chicken or vegetable broth
1 inch piece of fresh ginger, peeled
1 large clove of garlic, peeled
2 tablespoons soya sauce
1 tablespoon rice wine vinegar
½ teaspoon black pepper
2 portions of udon noodles
2 baby bok choy, washed and quartered (you can add bean sprouts or spinach)
2-3 king oyster mushrooms, sliced (you can use enoki, shiitaki, whatever you like)
1 package firm tofu, drained and cut into 1 inch cubes (here you can use shrimp, barbeque pork, grilled chicken, again whatever you like)
1 tablespoon of a neutral oil, like canola or vegetable oil
2-3 spring onions sliced
1 teaspoon toasted sesame oil

In a large saucepan, combine broth, soya sauce and rice wine vinegar. Grate the garlic and ginger into the broth. I use a microplane or small grater. Bring the broth to a boil and reduce to simmer for 5-10 minutes, just enough time to allow the broth to become infused with the garlic and ginger. Season with pepper and more soya sauce to taste.
In a small non-stick fry pan, sauté the mushrooms and tofu cubes in the tablespoon of vegetable oil until they are browned on all sides.
In a separate saucepan bring water to a bowl for the noodles. Cook the noodles according to the directions on the package. At the last minute add the quartered baby bok choy to the water, just to blanch the vegetable. Drain, rinse and set aside. I cook the noodles and bok choy separate from the broth so that they stay firm. I have found if you cook them in the broth both become mushy and the broth becomes cloudy.
Place a serving of the cooked noodles into your soup bowl. Place a serving of the mushrooms, bok choy and tofu on top. Pour the hot broth over your noodles and vegetables and garnish with the sliced spring onions and a drizzle of toasted sesame oil.

Saturday, March 20, 2010

Challah and an Amazing Cookbook


I, like most foodies, am addicted to cookbooks. They are the first things I go for whenever I visit a bookstore and I love checking out what is on the shelves whenever I visit a friend’s house. They are a great place for inspiration.

Having said that, I can't remember the last time I have actually bought a cookbook. Most of the time I look at the pictures and flip through the recipes and that is enough. I see a couple of ideas I like, some things I would like to try, but I rarely feel compelled to buy the book.

Well, that pattern changed for me a couple of weeks ago when I picked up a copy of Artisan Bread in 5 Minutes a Day, by Jeff Hertzberg and Zoe Francois. I had taken my kids to the local library as per our usual Saturday morning ritual. Once there, I immediately headed over to the cookbook section to check out what was in stock. I came across a copy of the book and began to flip through it.


I had heard of it, as it has swept many of the food sites that I visit, and I had already tried one of the recipes, so I was interested in reading the other recipes.

I have to say this book is a revelation. The thing about bread making for most home cooks is that it is such a dauntingly long and labourious process that most are either intimidated by the process or can’t be bothered to invest the time it takes just to get one loaf. This book absolutely changes that. It makes bread making accessible, easy and completely worth the effort.

As many of you have already gleaned from my earlier posts I am a big proponent of making things at home and avoiding processed food as much as possible. I think it is better for our bodies, better for the environment, and better for the family unit as a whole to be exposed to and involved in the process of getting fresh and real food to the table.


However, as much as I believe in that philosophy I was not undertaking to make my own bread all the time. I still will not claim that I have completely converted on that point, but I will say that I make it much more often. Since getting this book I have made the regular European Style Crusty loaf, the Peasant Multi-grain, the Pizza Dough, Focaccia, Cinnamon buns and, of course, the Challah. At one point, I had three different bread doughs on the go in my refrigerator at the same time. Space was becoming an issue.

Every recipe turns out a perfect example of the desired bread and the process is equally easy for all. Best of all each loaf costs a fraction of what you would pay in the store. My only consistent change is to reduce the salt content in each recipe as I found the finished loaves a little too salty.  Bottom line, I am so glad I came across this book.

Challah

adapted from Artisan Bread in Five Minutes a Day by Jeff Hertzberg and Zoe Francois
1 3/4 cups lukewarm water
1 1/2 tablespoons granulated yeast (2 packets)
1 1/4 tablespoons salt
4 large eggs, lightly beaten
1/2 cup liquid honey
1/2 cup butter, melted
7 cups unbleached all-purpose flour

Egg wash
1 egg beaten
1 tablespoon of water

Poppy or sesame seeds (optional)


Part One: Making the dough

Mix the yeast, salt, eggs, honey, and melted butter with the water in a large bowl or food container.  The dough will stay in whatever vessel you use to mix it in, so make sure it is large enough to store the risen dough but small enough to fit comfortably in your refrigerator.

Using a wooden spoon, mix in the flour.  The flour must be completely incorporated so you can use an electric stand mixer if you have one with a big enough bowl.  Other wise, stir until the flour is completely combined to create a sticky loose dough.  You can use wet hands to incorporate the last of the dough if you need to.
Cover your container and allow the dough to rest at room temperature until it rises and and falls back a bit, or becomes flat on top.  Make sure when you cover the container that you leave it open a bit to let the gas created by the rising process to escape. I cover my bowl with clingwrap and leave a little crack loose on one side. The rising process will take about 2 hours.
Once the dough has risen it can be used right away or can be placed in the refrigerator for future use.  Due to the eggs in the recipe is should be used within 4 days.  If you can not use it in that time, cut the dough into one pound pieces, about the size of a grapefruit, and freeze them in freezer safe bags for up to 4 weeks.  Remove as much air as possible from the bag before placing in the freezer and defrost in the refrigerator overnight when you want to use one.

Part Two: Baking

Grease a cookie sheet or line it with parchment paper or a silicone mat. Position an oven rack to the centre of your oven. Lightly dust the surface of the dough in your container with flour and pull off a 1-pound piece. Using a little more flour on your hands, quickly shape the piece into a ball by stretching the surface of the dough around to the bottom.
Divide the ball into three pieces and roll the pieces into a thin rope shape about 6-7 inches long.  If the dough is hard to work with let it rest for 5 minutes and begin rolling again until you get the desired shape. Begin braiding the dough, starting at the centre and working your way out in one direction and then repeat the process on the other side.  This will give your loaf a uniform thickness.
Move the prepared loaf to your cookie sheet and allow it to rest for 1 hour and 20 minutes(or just 40 minutes if you're using fresh, unrefrigerated dough). The loaf will rise again during this time.
Preheat your oven to 350-degrees about 15-20 minutes before it is time to bake. Adjust the time in accordance with how long it takes your oven to heat up. Brush the loaf with egg wash and sprinkle with poppy or sesame seeds, if you are using them.

Bake for 25 minutes or until your Challah is golden brown and springs back when lightly touched at the centre.  The loaf should offer resistence when you press down lightly between the braids. Remove from the oven and place on a baking rack to cool before eating.

Wednesday, March 17, 2010

Maple Syrup (and Buttermilk Waffles)


Many people think the first sign of Spring is the Crocus. I personally think it is Maple Syrup. I eagerly anticipate the warm days and cold nights of March as I know it means the sap is beginning to run in the Sugar Maple Trees. It is then that the Maple Sugar Producers are out tapping the trees and collecting the clear sap they will turn into golden syrup. The season is short, a couple of weeks if they are lucky, and that is it for the year. It is an amazing process and something worth seeing.

We usually visit a Sugar Bush each year. These pictures are from the Sandy Flats Sugar Bush in Warkworth Ontario. It is a fun trip for the kids. More importantly, it helps them to understand and connect with the seasonality of their food and the work that must go into getting it to the table. This is an important lesson for anyone and something that I think we are becoming very removed from as a society.


In my post on Buttermilk Pancakes I mentioned Curles which is a family run Sugar Bush that produces some of the best Maple Syrup I have ever had. I always buy the Amber, which comes from the last tap off of the trees for the season. It is dark and intensely flavoured. Many people use it just for baking but for me it is the only choice.

We put it on pancakes and waffles; I would never use anything else. I cook with it. I pour it over warm corn bread. My mother, as a special treat during Easter, would toast and butter Hot Cross Buns and give us a little dish of Maple Syrup to dip them into. It is something her father used to do for her, bringing home fresh Hot Cross Buns from his bakery just for the occasion, and it is a tradition I carry on with my children today. And believe it or not, sometimes at the beginning of the season when I just get my new batch for the year, I pour a little syrup into a glass and drink it straight; it is the best way to truly appreciate the complexity of flavour in Maple Syrup.


Last weekend we had it with Buttermilk Waffles. The recipe is below, but be sure before you make them that you have some Pure Maple Syrup to pour over top!

Buttermilk Waffles
adapted from The Better Homes and Gardens Cookbook

1¾ cups all purpose flour
1 teaspoon baking powder
½  teaspoon baking soda
1 tablespoon sugar
¼ teaspoon salt

2 egg yolks
1¾ cups milk
½ cup canola oil
2 egg whites

Combine dry ingredients in a medium mixing bowl. In a small bowl, combine egg yolks, milk and oil. Add wet mixture to dry ingredients and stir just until combined. Mixture will be lumpy. In a separate bowl, beat egg whites until they form stiff peaks. Fold egg whites into batter just until incorporated and a few streaks of egg white are still visible.

Pour appropriate amount of batter onto greased and pre-heated griddle and close lid (the amount will depend on the style of waffle maker you have). Do not lift lid during the baking period. Bake according to manufacturer’s directions. Repeat with remaining batter. Serve with Maple syrup.

Sunday, March 14, 2010

Lazy Sunday

Lazy rainy day at home...a few pictures of the day we spent doing nothing...

The first cup of the morning


A burst of color on a dull day


Buttermilk Waffles


Kids favourite challah for grilled cheese


Buttery popcorn and a good book


Thursday, March 11, 2010

Blueberry Muffins with a Lemon Glaze


When my eldest daughter was born my husband and I were surprised and delighted to discover that she had blue eyes. We had anticipated a brown eyed baby but she was born with the most amazingly deep blue eyes.

A few months later, when I was out for a walk with her, I had an encounter with a stranger that reminds me to this day how striking my daughter’s eyes were when she was born. She was bundled up in her stroller and I was shopping, in and out of fruit stands and food stores, just enjoying the chance to get out and to show her off.


At the last shop we stopped into I was at the counter paying for something when an elderly lady came up to peek in the stroller. The lady took one look at my daughter and said, "You look just like a blueberry muffin, you have such blue eyes." I thought it was such a cute thing to say and I called her my blueberry muffin for a while after that. I also immediately had a craving for blueberry muffins and went right home and made them.

A couple of years later we had another beautiful blue-eyed daughter, so now we have two blueberry muffins at home.

My mother has a muffin cookbook that is now just a collection of loose pages. It has been used so much and so many pieces have been lost that I can't even say what it is called or where it came from. It was from this book that my mother took her blueberry muffin recipe. I remember when I moved out on my own it was one of the first recipes I asked for. I had tried to find a recipe of my own that I liked but they never seemed to match hers so this is now my blueberry muffin recipe.


It makes a nice dense muffin with a subtle vanilla flavour that is the perfect backdrop for the blueberries. It is versatile enough that it could be made into a chocolate chip muffin, or lemon cranberry or pretty much any muffin recipe that requires a basic vanilla cake. When I make it with blueberries I add just a hint of cinnamon to the batter and a little lemon zest, but I would take those out for chocolate chip.

Blueberry Muffins
makes 12 muffins

2 cups all purpose flour
3 teaspoons baking powder
½ teaspoon salt
¼ teaspoon cinnamon
½ cup room temperature butter
1 cup sugar
2 eggs
1 teaspoon vanilla
1 teaspoon grated lemon peel
1 cup milk
1 cup fresh or frozen blueberries

Preheat oven to 375 degrees and place oven rack to the middle of your oven. Line the muffin tin with paper liners.
In a small bowl, stir together flour, baking powder, salt and cinnamon. Set aside. In a medium, bowl or electric mixer cream together butter, sugar and lemon peel until light and fluffy. Add eggs one at a time and mix until incorporated. Add vanilla to milk. Begin alternating dry ingredients and milk mixture into the batter beginning and ending with the dry ingredients. Mix just until incorporated. Scoop the batter by ¼ cupfuls into the prepared muffin tin. The paper liners should be 2/3 full. Bake for 20-25 minutes or until the muffins are golden brown and spring back when lightly touched in the centre. Remove from oven and cool completely on baking rack before glazing.


Lemon Glaze
1 cup icing sugar
2-3 teaspoons fresh lemon juice.

Mix icing the sugar and lemon juice in a small bowl. The glaze should have a runny consistency. Spoon glaze over cooled muffins and allow it to drizzle over the sides. Enjoy!

Monday, March 8, 2010

Bolognese Sauce


There are a few recipes that I consider essential in my kitchen, like Buttermilk Pancakes and Roast Chicken. Another recipe that falls under that category is Bolognese or meat sauce for spaghetti. This is especially true now that I have children, because they never tire of Spaghetti or “noonals” as my 2 year old calls them.


Despite its “essential” status in my kitchen, the ability to produce a good meat sauce seemed to elude me for a long time. Sure I made spaghetti sauce all the time, but it never had the thickness or richness of taste that I felt it should. I always found my sauce lacked…something.


Then one day I was watching Michael Smith create a spaghetti sauce on his show Chef at Home and all my frustrations were over. I tried his creation and it was perfect; thick and rich with the fullness and depth of flavour that I was looking for. Even better, I watched a group of Italian ladies recreate essentially the same sauce while watching an episode of Jamie Oliver’s Italian Escape (yes I watch a lot of Foodtv) and I knew that I was making an authentic Bolognese.

So, there are a few secrets to the recipe. The first is the addition of pancetta or bacon to the sauce which adds an intense smoky and rich backnote.


Second is to include a mixture of finely diced onion, carrots and celery (I use my food processor to finely mince the vegetables which saves time and makes sure that they incorporate well into the sauce). This combination thickens the sauce and counterbalances the acidity of the tomatoes.

Third is to use really good tomatoes. I use San Marzano tomatoes, which are available in the canned vegetable section of most supermarkets. They are so much better than the regular canned tomatoes. The sauce is thicker than the standard variety and they have a much better taste. Follow these steps, and if you wish add a glug of good red wine to the finished product, and you will have a fantastic Bolognese sauce.


Bolognese Sauce
adapted from Michael Smith's recipe from Chef at Home

1 small piece of pancetta or 2 slices of bacon, finely diced
2 tablespoons of good olive oil
1 carrot, peeled and finely minced
1 large onion peeled and finely minced
2 celery stalks, finely minced
2-3 cloves, garlic finely minced
1½ teaspoons oregano
2 28oz cans San Marzano tomatoes
1 5.5oz can tomato paste
1 tablespoon sugar
1 tablespoon of salt (or to taste, be careful as the amount will depend on how salty your bacon is)
½ tablespoon freshly ground pepper
2 tablespoons good red wine
1lb lean ground beef or mixture of ground beef and pork, or mixture of ground beef and Italian sausage, casings removed.

There are two ways you can deal with the meat in this recipe. You can either sauté it after the bacon if you want the meat incorporated throughout the sauce, or you can wait until the end, shape the meat into meatballs and add it to the sauce. Simply drop the shaped balls into the simmering sauce and leave them to cook for twenty minutes. I will cover the meatball process in more depth at the end of the recipe.

Mince carrots, onions, celery and garlic in a food processor or by hand. Set aside. In a large sauce pan, heat olive oil over medium heat. Add bacon or pancetta and sauté until browned and crisp. Remove from pan and drain on paper towel. Remove enough oil and bacon fat to leave about 1 tablespoon in the pan. If you are incorporating the meat throughout the sauce add it to the pan at this point and sauté until browned. Add the mixture of minced carrots, celery, onion and garlic. Sauté until soft but not browned. Add the oregano and sauté for a couple of minutes. Add the canned tomatoes, sauce and all, to the pan. Using a wooden spoon, break the tomatoes up into small pieces as you mix the ingredients together. Add the tomato paste, sugar, salt and pepper. Stir into the sauce. Simmer for twenty minutes on low heat, stirring occasionally. The sauce will thicken and the flavours will meld together. Add the red wine if desired and allow the sauce to cook a couple of minutes more. The sauce is now ready to serve.

Meatballs

1lb lean ground beef or mixture of ½ lb of ground beef and ½ lb of ground pork, or mixture of ½ lb ground beef and ½ lb of Italian sausage, casings removed.
1½ teaspoons salt
½ teaspoon freshly ground pepper
1 teaspoon garlic powder

I keep my meatballs pretty simple and this is my preferred way to add meat to the Bolognese sauce. After the sauce is ready I mix ½ lb of ground beef with a ½ lb of Italian sausage, casing removed. Place the meat into a large bowl and add the salt, pepper and garlic powder. Mix together. Be careful not to over mix the meat or it will be tough, you need a light touch for this part. Shape the mixture into 1 inch balls and drop them into the simmering sauce. Turn the heat to low and allow the meatballs to simmer in the sauce for 20 minutes. Do not stir for the first 10-15 minutes to prevent the balls from breaking apart. They will cook in the sauce and absorb some of the flavour. After 20 minutes, check to see that they are cooked through by breaking one meatball in half. Once they are cooked you are ready.

Serve the sauce over the pasta of your choice and add a good grating of really nice parmesan cheese.

Tuesday, March 2, 2010

Amazingly Decadent Brownies


I am writing this post under the influence. I am in a haze of brownie euphoria. I have overindulged over the last couple of days, but I cannot seem to stop myself. There is probably not much on this earth that comes closer to perfection than a good brownie. Rich, fudgy and so much chocolate it should probably require a license. That is the perfect description for a Baked Brownie.


I came across the recipe while surfing the net. I think I first heard about it on Cakespy and from there I have found it on numerous sites. It is so good that it gets written about a lot, and I am not going to be an exception. The brownie recipe from Baked: New Frontiers in Baking, is in my opinion the best I have ever tasted. It should be; there are 11ounces of melted chocolate in the batter. And be prepared, the recipe makes a lot of brownies, so you will be eating brownies for days. This is a marathon people, not a sprint, so pace yourself.


I have made them numerous times since I found the recipe; the only change I make is to cut the salt to a ½ teaspoon. I found the original recipe a little too salty. Otherwise, fantastic, so pull up a chair and get yourself a big glass of milk.


Brownies
adapted from Baked: New Frontiers in Baking

Make sure your eggs are room temperature when you make this recipe, it makes a difference.  Also, I use Ghirardelli cocoa powder and chocolate that is 72% cocoa mass.  Anything less and it will not have the same intense chocolate flavour. Follow the directions exactly as the key to the recipe is not only the ingredients but also the way they are put together. It seems like a lot of steps, but believe me it is worth it.

1-1/4 cups flour
1/2 teaspoon salt (the original recipe calls for 1 teaspoon)
2 tablespoons dark cocoa powder
11 ounces dark chocolate, chopped
1 teaspoon instant coffee powder
1 cup butter, cut into cubes
1/2 cup brown sugar
1-1/2 cups sugar
5 large room temperature eggs
2 teaspoons vanilla extract

Preheat oven to 350 degrees. Butter a 9x13 inch baking pan.
Combine the flour, cocoa powder and salt in a small bowl and set aside.
In a large saucepan, melt the chocolate, the butter, and the instant coffee powder over very low heat, stirring constantly to avoid burning the chocolate. The mixture should become smooth and liquid and all of the chocolate and butter pieces will be completely melted.  Turn off the heat and add both sugars, whisking until they are completely combined.  Remove the pan from the element and allow the mixture to come to room temperature.
In a seperate cup, slightly beat three eggs. Add them to the cooled chocolate mixture and whisk until just combined. Whisk the vanilla into the remaining eggs and then whisk that mixture into the chocolate batter until just combined.  Be careful not to overmix at this point.
Sprinkle the flour, cocoa and salt mix over the chocolate batter and fold together using a rubber spatula.  Do not use a whisk for this step.  You are finished when there is just a trace of the dry ingredients visible in the batter.
Pour the mixture into the prepared pan and smooth the top. Bake for 30 minutes, rotating the pan half-way through. Check for doneness by inserting a toothpick into the center of the brownies. They are done when the toothpick comes out with a few moist crumbs. Do not overbake. Cool, cut and serve with milk.
Related Posts Plugin for WordPress, Blogger...