Monday, September 27, 2010

Homemade Salsa


Look at that picture.  Doesn't that just look like the height of harvest season.  Gorgeous fresh tomatoes, pepper, herbs...just calling out to be turned into salsa.  At the farmer's market in Campbellford there is a gentleman that sells these baskets with his own homemade salsa recipe tucked inside.  We buy one every once in a while and make a great big bowl of salsa.


Once you make your own you will never want to go back to a jarred version. It is just so much fresher and open to so many possibilities.  The basket we picked up last time had plenty of tomatillos, which is a nice change.  They add a sour note to the sweetness of the tomatoes. I always ask to switch in parsley for the coriander (I personally think that coriander should be outlawed...blech) And, as an alternative, a few more times around in the food processor and your fresh salsa becomes a lovely gazpacho.  Add a few chunks of English cucumber and chopped tomato for garnish and you have a quick and delicious light lunch. Either way, it is a great way to enjoy the best of the season.


Homemade Salsa

3 cups tomatoes, chopped finely
1 cup tomatillo, finely chopped

1/2 cup onions, coarsely chopped
1/4 cup green pepper, coarsely chopped
1/4 cup red pepper, coarsely chopped
6 -7 cloves garlic, finely chopped
fresh jalapeno pepper, finely chopped (add as much as suits your taste)
1/4 cup coriander or flat parsley, finely chopped
2/3 cup red wine vinegar
1 tablespoon salt
1 teaspoon white (or black) pepper

You can chop all of the vegetables by hand or in a food processor.  I use a food processor, but I also hand chop about 1 cup of the tomatoes and 1/2 cup of the tomatillos as I like my salsa to be more chunky. 

If you use the food processor, first add the garlic and jalapeno. (I started with just a 1/4 of the jalapeno as my kids don't like it too spicy) Pulse until they are finely chopped.  Then add the onions and pulse a couple of times. Add the tomatoes, tomatillos and parsley (or coriander) last so that they do not get too finely pureed.
Pour the mixture into a bowl and add the remaining ingredients.  Stir to combine.  Adjust the seasoning to your taste.  Serve with chips, pita or over grilled fish or chicken.

As an alternative, you can add 1/2 an English cucumber and puree until smooth and serve chilled as gazpacho.

Monday, September 20, 2010

Cinnamon Buns


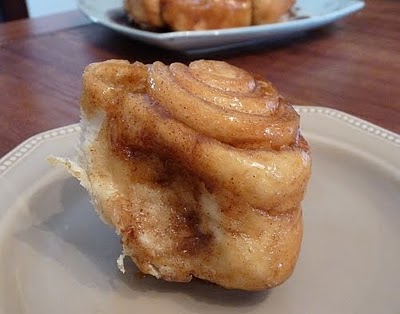
This seemed like a good recipe for a crisp Autumn day. Cinnamon Buns...there is nothing like them, warm out of the oven on a cold morning, it just makes the whole house smell delicious. 

I have been craving them for a while, ever since my last trip up to my parent's place.  We visited my uncle's bake shop (the same shop my grandfather used to run) and bought Chelsea Buns.  That is what my Grandfather called his cinnamon rolls.  When I got home, I found I was still craving them. That warm, heady smell of yeast and bread rising mixed with the thick perfume of cinnamon is almost visceral for me. 


That, to me, is the essence of being in my grandfather's shop. Early in the morning, before it was open and before customers were coming and going, the air always felt very close, almost unbearably warm and humid. The combination of the ovens heating and the proofing room full of rising bread created a warm cloud of sweet smelling air that hit you as soon as you walked through the door. Even now, whenever I go into a bakery, I experience the same feeling I used to have walking into my grandfather's shop early in the morning. It's hard to describe, it's almost like I feel it in my chest and my head at the same time, memory mixed with the aroma of bread baking.

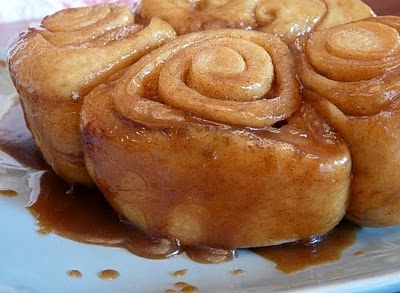
I think my grandfather liked working with the bread the most. It had endless possibilities...egg bread, brown bread, sweet bread, bread brimming with cheese or little delicate rolls that he would shape into ovals or rounds or ones that to me looked like butterflies in little cups. But best of all was bread that he rolled flat, filled with cinnamon and sugar and baked in a pool of caramel sauce.  There were 12 in a pan, smaller and more delicate that the monstrously large cinnamon buns you can buy now. 

This recipe is not the one from the shop, but it is a very close approximation.  I used the Challah recipe from the Artisan Bread in 5 Minutes a Day 
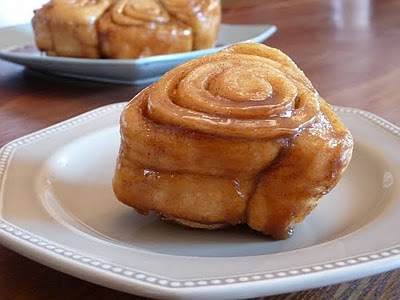
cookbook and I followed the directions to turn the bread into cinnamon rolls.  They turned out beautifully. Because the recipe came from that cookbook the dough was very simple to make and easy to work with. The recipe seems daunting, because there are so many steps, but do not be turned off by it.  It is easy to do and you will have the reward of a beautiful smelling house and and a wonderful treat just waiting to be enjoyed. 


Cinnamon Rolls
adapted from Artisan Bread in Five Minutes a Day by Jeff Hertzberg and Zoe Francois

1 3/4 cups lukewarm water
1 1/2 tablespoons granulated yeast (2 packets)
1 1/4 tablespoons salt
4 large eggs, lightly beaten
1/2 cup liquid honey
1/2 cup butter, melted
7 cups unbleached all-purpose flour

Part One: Making the dough

Mix the yeast, salt, eggs, honey, and melted butter with the water in a large bowl or food container. The dough will stay in whatever vessel you use to mix it in, so make sure it is large enough to store the risen dough but small enough to fit comfortably in your refrigerator.

Using a wooden spoon, mix in the flour. The flour must be completely incorporated so you can use an electric stand mixer if you have one with a big enough bowl. Other wise, stir until the flour is completely combined to create a sticky loose dough. You can use wet hands to incorporate the last of the dough if you need to.

Cover your container and allow the dough to rest at room temperature until it rises and and falls back a bit, or becomes flat on top. Make sure when you cover the container that you leave it open a bit to let the gas created by the rising process to escape. I cover my bowl with clingwrap and leave a little crack loose on one side. The rising process will take about 2 hours.

Once the dough has risen it can be used right away or can be placed in the refrigerator for future use. Due to the eggs in the recipe is should be used within 4 days. If you can not use it in that time, cut the dough into one pound pieces, about the size of a grapefruit, and freeze them in freezer safe bags for up to 4 weeks. Remove as much air as possible from the bag before placing in the freezer and defrost in the refrigerator overnight when you want to use one.

Part Two: Making the Cinnamon Rolls

Caramel Sauce
6 tablespoons room temperature butter

1/2 teaspoon salt
1/2 cup brown sugar

Cinnamon Filling
4 tablespoon room temperature butter

1/4 cup sugar
1 tsp ground cinnamon
1/4 tsp freshly grated nutmeg

In a small bowl, cream together the butter, salt and brown sugar to make your caramel sauce.  Spread the mixture evenly over the bottom of a 9 inch square or round pan. Set aside.
Pull a melon sized ball from the prepared dough.  Flour your hands and gently but firmly shape the piece of dough into a smooth ball by stretching and tucking the sides under.  Place on a well floured surface and let the dough rest, covered with a towel to take the chill off while you prepare rest of ingredients.

For the filling, in a small bowl cream together the butter, cinnamon, nutmeg and sugar. Set aside.

Now, roll the dough into an 1/8″ thick rectangle. Spread the filling evenly on the surface. Then roll the dough up, starting with the long side. Take a serrated knife and cut it into 9 even pieces. Place the cut pieces, cut side up, in the prepared pan, lining them up so that they fit evenly. Cover loosely with a towel and let sit until almost double in size, about an hour.

Preheat the oven to 350 degrees. Bake 35-40 minutes in the centre of the oven until golden brown.

Remove from oven and run a knife around the edge of the rolls to loosen them from the side of the pan.  Invert onto a plate.  Let cool a bit before serving, if you can wait that long.

Tuesday, September 14, 2010

Apple Pandowdy


Hi, it's me.  It's been a while.  I have gotten a little off track with my schedule. Life has just gotten in the way a bit.  Back to school, sick child, busy job and how do you get it all done?  Honestly, if I could figure out the answer to that question I would be much more organized, and a millionaire. But I am making a concerted effort to get back into the rhythm of things.

The good news it that I have still found the time to cook. So tonight I am writing about the Apple Pandowdy I hinted at during my last post.  Now, I am not going to pretend I have much experience with this dessert.  In fact, what made me try it was the name...I have always wanted to make an Apple Pandowdy, I just like the sound of it...Apple Pandowdy.


I remember my mother singing "Shoofly Pie and Apple Pandowdy makes your eyes light up and your tummy say howdy". It's an old song, and I don't know where it comes from, but it planted a desire to try those desserts firmly in my brain (I still haven't tried Shoofly Pie, but one day...).

As it turns out it is just a simplified version of an apple pie.  The recipe I tried included raisins and rum, which is what sold me. Also, I really liked the spice combination, this was like my first real "Autumn" dessert of the year.  The apples are cooked in a baking dish with a biscuit or pastry topping, which made for a nice fruit to pastry ratio. I often find regular apple pie too heavy on the pastry side. Overall I would have to say it did make my tummy say howdy...now we'll have to see about Shoofly Pie.


Apple Pandowdy
Adapted from a recipe found in the July 2010 issue of Canadian Living Magazine.

1/2 cup raisins
1/4 cup rum or brandy
8 cups sliced peeled apples
1/3 cup sugar
2 tablespoon flour
1/2 teaspoon ground cinnamon
1/2 teaspoon ground ginger
1/8 teaspoon ground cloves
1/8 teaspoon ground nutmeg
1 egg yolk
2 tablespoons coarse sugar

Single Crust Pastry Recipe:

1-1/4 cups all-purpose flour
1/4 teaspoon salt
1/3 cup shortening
4-5 tablespoons ice cold water


In microwaveable bowl, stir raisins with rum. Microwave on high for 1 minute. Let stand for 15 minutes.
In large bowl, toss together apples, raisins and any remaining rum, sugar, flour, cinnamon, ginger, cloves and nutmeg. Spread in 8-inch baking dish.

To make the pastry, in a small bowl mix the flour and salt. Cut in the shortening with a fork or a pastry cutter until the mixture resembles coarse crumbs. Add the cold water and stir just until the dough starts to pull together.

Turn out onto a well floured surface. Quickly shape into a ball and roll out to a 1/4 inch thickness.Lay rolled pastry over the fruit, draping the excess over the side of the baking dish. Flute the edge of the pastry by pinching it together between your thumb and first finger. Trim off the excess. Mix yolk with 1 tsp water; brush over pastry. Sprinkle with coarse sugar. Cut steam vents in top.

Bake in 400°F oven for 20 minutes. Reduce heat to 350°F and bake until pastry is golden, about 25 minutes. Remove from oven and cool. 

You can break the pastry into 2 inch chuncks with a large spoon, which is the "dowdy" part of pandowdy, but I didn't bother because this happens as you serve it.  It is great warm with a little vanilla ice cream.

Wednesday, September 8, 2010

Peach Cobbler


I spent the weekend at my parent’s house. I always enjoy going up there because my mother likes to cook and experiment with new recipes as much as I do. I come armed with new culinary discoveries and recipes that I want to try and we (without fail) whip up more food than we can possibly eat.


This past weekend we visited the Fifth Town Cheese Factory, made a trip to the farmers market, made a stop at my uncle’s bakeshop, stopped into a local Cider maker, visited another local cheese factory and made two kinds of fruit dessert.

The first dessert we made was a Peach Cobbler. At the farmers market we bought a lovely basket of Ontario peaches, so it seemed appropriate to make a dessert with them. I had actually never made a proper cobbler before this. I am usually a fan of fruit crisps but this time, I decided to try something different.

We found the recipe in Canadian Living magazine, but of course, we had to change it up a bit. We added a bit of nutmeg, just to spice the fruit up a bit and we added buttermilk and a bit of soda to the biscuit recipe, to lighten them up.  The end result was delicious, silky peaches with light and fluffy biscuits.  Perfect with a scoop of vanilla ice cream.  Yum...wait until I tell you about the Apple Pandowdy (I made it just for the name) but that will have to wait for another day...


Peach Cobbler

Adapted from September 2010 issue of Canadian Living

7 cups peaches, sliced and peeled
1/3 cup packed brown sugar
2 tablespoons flour
1 tablespoon lemon juice
1/4 teaspoon salt
1/4 teaspoon nutmeg


Biscuit mixture:

1 1/4 cup flour
1/4 cup butter, cubed

2 tablespoon packed brown sugar
1 1/2 teaspoon baking powder
1/2 teaspoon baking soda
pinch of salt
1/2 cup buttermilk

Preheat the oven to 350 degrees.
In a medium bowl mix together the prepared peach slices with the sugar, flour, lemon juice, salt and nutmeg.  Pour mixture into a 8 inch baking pan. Bake for 20 minutes (without biscuit topping). 
While the peaches are baking, prepare your biscuit mix.  In a second bowl, mix the flour, brown sugar, salt, baking powder and baking soda. Add the butter cubes and mix into the flour mixture until the mixture resembles coarse crumbs. Add the buttermilk and stir together just until combined. 
Once the 20 minutes are up, remove the pan with the peaches from the oven. Drop the biscuit mixture by heaping tablespoon on top of the hot peaches (You should have about 9 tablespoons).
Return the pan to the oven and bake until the biscuits are golden and cooked through on the bottom, about 40 minutes.  Remove from the oven and serve warm with ice cream.

Friday, September 3, 2010

Ricotta Gnocchi with Roasted Tomato Sauce


I have never made homemade pasta.  It is one of those things that I find intimidating.  I have promised myself that I will try to tackle it...one day. It is on my to do list.

I think what keeps me from making it is the fact that I do not have any of the fancy equipment. I know that it will require endless amounts of tedious hand rolling to get a nice thin sheet of pasta. And then I will have to hand cut all of the noodles, ugh. (Did I just admit to being lazy?) 

At any rate, I have made homemade gnocchi.  In fact, I have made it more than once and each time it has turned out beautifully. That's close, it is in the pasta family... it counts. The recipe that I keep going back to is Ricotta Gnocchi.  Truth be told, I am not a huge fan of the regular potato gnocchi.  More often than not I find it doughy and thick and just too starchy.  


But these Ricotta Gnocchi are a whole different story.  They are light and delicate.  They have a very subtle cheese and egg flavour which pairs very nicely with the roasted tomato sauce.  This recipe requires a bit of time and work.  The tomato sauce is the most involved piece, in that you have to roast the tomatoes before you bring the sauce together.

They are worth the effort and while I would not recommend this dish for a weeknight meal it is a great option for a night when you have a little more time and you want something special.  And the best part is you can pat yourself on the back because you have made homemade pasta. (That's right, it counts!)


Ricotta Gnocchi with Roasted Tomato Sauce
adapted from the September 2000 issue of Gourmet Magazine

2 lb plum tomatoes, trimmed and halved lengthwise
1/4 cup olive oil
1/4 cup water
2 tablespoons butter
1 teaspoon salt
1/2 teaspoon pepper
3 large eggs
1 (15-oz) container ricotta
1 cup all-purpose flour
handful of fresh basil leaves
freshly grated Parmesan cheese

Preheat oven to 400°F.
Place tomatoes, cut sides up, in a single layer on a cookie sheet.  Drizzle with olive oil and season well with salt and pepper. Roast about 45 minutes until the skins are browned and wrinkled. Remove from oven and set aside to cool.

While the tomatoes are roasting you can begin to make the gnocchi. Bring a large pot of salted water to a boil.
In a medium bowl, beat together eggs and ricotta with a whisk until well blended. Stir in flour, 1 teaspoon kosher salt, and 1/2 teaspoon pepper until combined. Your batter will be soft.
Use a small ice cream scoop or two small spoons to make the gnocchi. (If using small spoons, teaspoons from you cutlery work best) Scoop up a rounded spoon of batter, then use second spoon to scoop mixture off and into boiling water. Make 9 more gnocchi, scooping and dropping .into the water as you go.  The water should be at a good rolling boil when you start.
Simmer briskly until gnocchi are just firm in centre and cooked through, about 5 minutes. Transfer with a slotted spoon to a platter and cool, covered with damp paper towel. Continue making gnocchi in batches of 10.
 
When tomatoes are cool enough to handle, give them a quick pulse in a food processor to break them down. Then scrape the pulp, skins, seeds, and any juices through a fine sieve set over saucepan. Press on solids in sieve to extract juices. Discard skins and seeds.
Stir 1/4 cup water into tomatoes and bring to a simmer over low heat. While tomatoes are coming to a simmer, melt 2 tablespoons butter in a 12-inch nonstick skillet over moderate heat. Sauté gnocchi, turning gently, until heated through and lightly browned, about 4 to 5 minutes.
Season gnocchi with salt and pepper. Serve with warm tomato sauce, fresh basil and a good shaving of  Parmesan.

Related Posts Plugin for WordPress, Blogger...