Friday, July 30, 2010

Grand Marnier Cake


A couple of days ago I received a very nice comment on my first post from a woman named Kathy. She connected with the story about my Grandmother and the rhubarb as she had a similar experience in her childhood. I thought her comment was lovely and as I often do I followed the link to find out a bit more about the person who left the message.


And, as is often the case, following the comment link led me to another food blogger. Meeting fellow food bloggers has been one of the best perks to come out of writing Radishes and Rhubarb. I have already made connections with people all around the world in the seven short months since I began this project.  In this case her blog goes by the name of Polwig. It is a great site that covers a number of topics from cooking to parenting. I opened up her site and right away stumbled upon her recipe for Frangelico Cake.


I was intrigued by the idea of using Frangelico in a cake so I printed out her recipe and made the cake…well, sort of. As you can tell my recipe used Grand Marnier instead. I was sure I had all of the necessary ingredients on hand but halfway into making the cake I realized I did not have any Frangelico. I was sure I had it because I had bought a bottle and didn’t really like it as a drink. I kept it thinking it would be very nice for baking. What happened to it from there I still don’t know (maybe hubby has developed a late night Frangelico habit). Anyway, not to be deterred I grabbed the bottle of Grand Marnier and forged on.

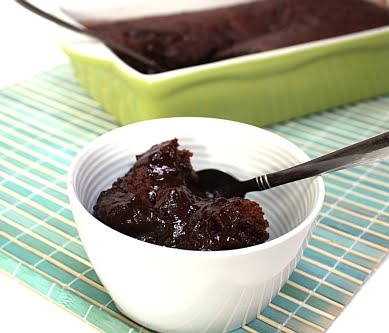
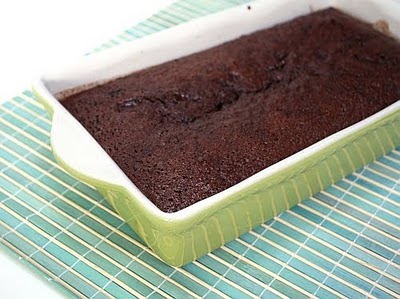
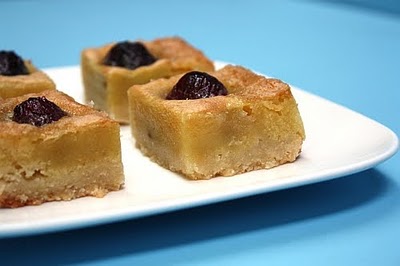
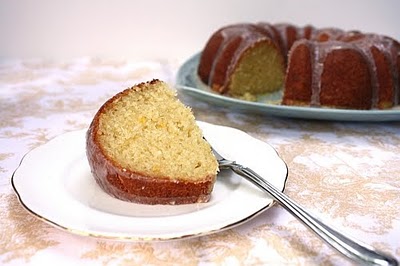
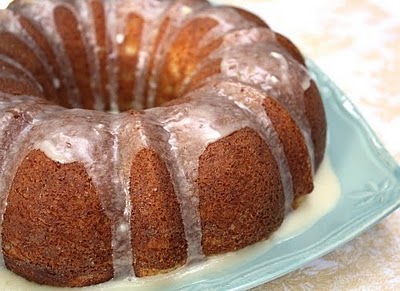
The cake was delicious. Moist and dense with a very nice citrus flavour. I made a glaze with the Grand Marnier and a little icing sugar which turned out to be the perfect finishing touch. This was a good basic cake that would allow for any number of flavour combinations...even Frangelico, if you happen to have some on hand.


Grand Marnier Cake
adapted from Polwig

1 1/2 cups flour
1 1/2 cups sugar
1/2 teaspoon baking soda
1 teaspoon salt
zest of one orange
zest of 1/2 lemon
2 1/2 teaspoon baking powder
3/4 cup butter, room temperature
1 1/2 cups of ricotta
1 1/2 teaspoon vanilla
1/4 cup Grand Marnier
3 eggs


Grand Marnier Glaze

2 cups icing sugar
2 tablespoons Grand Marnier
1 tablespoon orange juice
zest from 1/2 orange
1 teaspoon vanilla


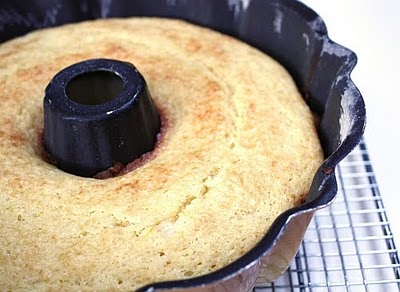
Preheat the oven to 350 degrees. Liberally grease and flour a bundt pan.
In a small bowl, sift together the flour, baking soda, baking powder and salt.
With a stand mixer or hand mixer on medium speed, cream together the butter, sugar and ricotta until pale and fluffy. Add the eggs one at a time, mixing each one until incorporated.
Add the Grand Marnier, orange and lemon zest and vanilla. Mix until incorporated. With the mixer on low speed, add the dry ingredients and beat just until the batter comes together. Do not over mix.
Pour the batter into your prepared pan and bake for 35-40 min or until golden brown and a toothpick inserted in the centre comes out clean.
Remove from the oven and cool for 5 minutes on a baking rack and then unmould into a plate. 
In a small bowl mix together the vanilla, Grand Marnier, orange juice, zest, vanilla and icing sugar until smooth.  Pour over the cake while it is still warm.  Cool the cake completely before slicing.

Next post:  Zucchini, Feta and Mint Tart

Monday, July 26, 2010

Corn and Blue Cheese Chowder


I know what you are saying. “Corn Chowder in the middle of summer, are you mad?” Well maybe, but this is the one soup I always make in the summertime. Sure it is hot as Hades, but what better time is there to make corn chowder than when Ontario corn is fresh and sweet and just perfect? I can’t think of a better time, so there you have it…Corn Chowder, or to be more specific Corn and Blue Cheese Chowder!

This is another Barefoot Contessa recipe. You just can’t go wrong with an Ina Garten recipe as far as I’m concerned. She always seems to know how to make the best of simple ingredients. And I love watching her show too. She always says “what could be wrong with that?” as she throws a pound of butter or a couple of cups of cream into her recipes. It always makes me laugh.


Anyway, I watched her make this recipe a few years ago and decided I had to make it right away. Since that time it has been a staple in my kitchen. As soon as the local corn is ready it magically appears at our table. And good thing, because my kids can’t get enough of it. We had it for lunch yesterday and they each had three bowls, no kidding…three bowls.

I did change up her recipe a little bit though. I was out of my old cheddar, so I decided to substitute in a bit of blue cheese and some medium cheddar (just to cut the sharpness of the blue). I was also out of bacon, let’s face it I was not very well prepared yesterday, so I used pancetta instead. As is often the case, my experimenting and substituting turned out to be a winner. The blue cheese added a nice sharp kick and the pancetta was so crisp and salty, it was the perfect complement for the corn and potatoes. And what could be wrong with that?


Corn and Blue Cheese Chowder
adapted from the Barefoot Contessa Cookbook
4 ounces pancetta, chopped
2 tablespoons good olive oil
4 large onions, diced
3 stalks celery, diced
2 tablespoons butter
1/2 cup flour
1 teaspoon kosher salt
1 teaspoon freshly ground black pepper
1/2 teaspoon ground turmeric
8 cups chicken stock
2 cups unpeeled new potatoes, cubed
2-3 cups fresh corn kernels (5-6 cobs of corn)
1 cups half-and-half
4 ounces blue cheese (I used Stilton) crumbled
2 ounces medium cheddar, grated

In a large stockpot, cook the pancetta and olive oil over medium heat until the pancetta is crisp, about 5 minutes. Remove the pancetta with a slotted spoon and drain on a paper towel. Set aside

Remove all but one tablespoon of the bacon fat from your pan. Reduce the heat to medium; add the onions, celery and butter, and sauté for 10 minutes, until the onions are translucent.

Stir in the flour, salt, pepper, and turmeric and cook for 3 minutes. Whisk in the chicken stock until the soup is smooth. Add the potatoes and bring to a boil. Reduce heat to medium low and simmer uncovered for 15 minutes, until the potatoes are tender. Add the corn to the soup and simmer 5 minutes more. Remove the pot from the heat. Add the blue cheese and cheddar and stir until melted. Add the half-and-half and just until combined. Season, to taste, with salt and pepper. Serve hot with a garnish of bacon and extra blue cheese crumbles.

Friday, July 23, 2010

Cheaters Lasagna


I try very hard to make everything from scratch. Mostly because I really enjoy the cooking process, but also because I just want to control what goes into my food. That’s not always possible when you make something processed. But there are ways; you just have to be choosy.

As I mentioned, I am pretty pressed for time at dinner these days. Right now, I am all about the 30 minute dinner and 30 minute dinners require shortcuts. Like the other night when I made lasagna…well not really lasagna, I made cheaters lasagna.


There is a store in my area that makes really good homemade ravioli. It is fresh pasta and they have all kinds of varieties. When I make this dish I choose the spinach and ricotta filling. The noodles take 3-4 minutes to cook, so it couldn’t be faster to put this together. After I boil the noodles I toss them in a marinara sauce and pour the whole thing into a baking dish. Then I throw in a few dollops of fresh ricotta, put a little grated mozzarella on top and bake it for about 20 minutes. Voila, lasagna…in less than 30 minutes.

Fact is, I actually like this better than regular lasagna. The ravioli has the perfect amount of spinach and cheese and the fresh ricotta gets creamy and warm once it is baked with the pasta. Overall, a very satisfying way to make a quick baked pasta.

If you have more time, you could add spinach to the sauce or mix the ricotta with some extra basil, Parmesan and grated mozzarella cheese before you add it to the pasta. You could also change up the taste by choosing different ravioli. How about butternut squash ravioli with a cream sauce and sage…hmmm, maybe I will have to try that one next time!


Cheaters Lasagna

2lbs homemade ravioli or filled pasta of your choice
2 cans San Marzano tomatoes, crushed
2 tablespoons olive oil
1 small onion, diced
1 garlic clove, minced
handful of fresh basil leaves, torn
salt and pepper to taste
1/2 lb fresh ricotta
2 cups grated mozzarella

Preheat oven to 375 degrees. Put a large pot of water on the stove to boil. Add the pasta and cook according to package directions. For fresh pasta I take 1 minute off of the cooking time so they do not get too soft when baking.
Heat the olive oil in a large saute pan over medium heat. While you are waiting for the water to boil, saute the chopped onion and garlic in the olive oil until translucent, about 2 minutes. Add the crushed tomatoes and salt and pepper to taste. Let simmer for 5 minutes. Just before you are ready to take the sauce off the heat add the torn basil leaves and stir to incorporate into the sauce.
Drain the pasta and toss into the sauce.  Pour everything into a 9 inch baking dish.  Using a large soup spoon, drop dollops of fresh ricotta cheese into the ravioli and sauce mixture.  I usually add 5-6 dollops of cheese, but you can add as much or as little as you like.  Sprinkle the grated mozzarella over top and bake for 20 minutes until the cheese is melted and browned.  Enjoy!

Monday, July 19, 2010

Chocolate Pudding Cake


Sometimes you need dessert and you need it fast. Last night I was in need of something chocolate, stat. When I am craving a fast chocolate fix I usually think of two things. The first is ice cream with chocolate sauce (that is an “in case of emergency break glass” kind of quick dessert) and the other is Chocolate Pudding Cake.


If you have never tried Chocolate Pudding Cake, then I strongly suggest you do, soon. There are many different recipes out there and they all perform the miracle of making a chocolate cake that is already bathed in its own chocolate fudge sauce. Eat it warm out of the oven and life doesn’t get much better than that.

This was my mother’s quick chocolate go-to dessert and I think it is one of the first recipes I actually made by myself. I remember her making it as a mid-week treat. It is ridiculously easy but infinitely satisfying, mostly because it feels like you have performed magic when it is done…warm fudgey brownie-like cake on the top and melting chocolate sauce on the bottom. It takes a little more time than chocolate sauce, but it is worth it.

I found this recipe at Sunday Night Dinners. The recipe I had been using was from the Better Homes and Gardens Cookbook. It is a good recipe but I wanted to up the chocolate quotient a little bit, so I decided to try this new recipe. It was perfect and I think it will be the one I use from now on. The addition of the chocolate chunks really put it over the top. Give it a try the next time you need something quick.


Chocolate Pudding Cake
adapted from Sunday Night Dinners.  I add a little coffee to most chocolate desserts as it helps to bring out the chocolate flavour.  Feel free to omit it if you don't want it.

1 cup all-purpose flour

2/3 cup unsweetened cocoa powder
1/2 teaspoon baking powder
1 teaspoon instant coffee
3/4 teaspoon salt
2 large eggs
1 cup sugar
3/4 cup milk
4 tablespoons butter, melted and cooled
2 teaspoons pure vanilla extract
3/4 cup firmly packed brown sugar
1 1/2 cups boiling water
1/2 cup bittersweet chocolate, broken into small chunks

Preheat oven to 350° F. In a medium bowl, sift together flour, 1/3 cup of the cocoa powder, baking powder, instant coffee and salt. Set aside.

In a small bowl, whisk together eggs, sugar, milk, melted butter, and vanilla. Add to flour mixture and stir until just combined. Spread batter a 8 inch baking dish. Set aside.

In a medium bowl, whisk together remaining 1/3 cup cocoa powder, brown sugar, and boiling water. Pour evenly over batter. DO NOT MIX. Scatter choclate chunks over the batter. Bake until a tooth pick inserted into the center of the cake comes out clean, about 30 to 35 minutes. Let cool 10 minutes. Serve warm as is or add vanilla ice cream or whipped cream.

Thursday, July 15, 2010

Risotto with Feta Cheese and Parsley


I recently started a new job. As you can imagine, this has dramatically reduced the amount of time I have available for cooking. For the last year or so I had been home with the kids, but now I am back at work and that means a complete re-approach to dinner time.

We have been through this before and, I have to be honest, I prefer cooking when I have all kinds of time to prepare and shop for ingredients. Who wouldn’t feel the same way?


But despite the change in schedule I am determined to make the kind of food that we are used to eating. It requires a lot more organization and it inevitably means making meals during the week that take less time to prepare. Luckily I have a roster of quick dinners. These are the “30 minute or less” meals that get you through the Monday to Friday crunch.

Like the other night, when I made Risotto with Feta Cheese and Parsley. My kids are always happy with this dish. My eldest daughter loves feta cheese, so I can pretty much feed her anything as long as it includes feta. My youngest just loves rice, so check and check. Risotto comes together in about 20 minutes, which was just long enough to steam some green beans and barbeque a couple of sausages (to keep hubby happy). Voila, dinner in less that 20 minutes! And the recipe makes enough for leftovers, so there’s lunch solved for the next day. Boy, if only everything came together so quickly, like trying to get everyone out of the house in the morning…but that's another story.


Risotto with Feta Cheese and Parsley
adapted from the June 1995 issue of  Cooking Light Magazine

1 tablespoon olive oil
1 cup chopped shallots
1 large garlic clove, minced
1 1/2 cups uncooked Arborio rice
1/2 cup white wine (optional)
6-7 cups chicken or vegetable broth
1/2 cup crumbled feta cheese, divided
1/3 cup chopped fresh flat-leaf parsley
1/4 cup (1 ounce) grated Parmesan cheese
freshly ground pepper

In a medium saucepan heat the olive oil on medium heat. Add shallots and garlic and sauté until the onions are translucent. Stir in rice, saute one minute more. Add the white wine and cook until just absorbed. Stirring constantly, add 1/2 cup broth; cook until liquid is nearly absorbed. Continue adding the remaining broth, 1/2 cup at a time, stirring constantly until each portion of broth is nearly absorbed before adding the next portion of broth. One the rice is cooked but still firm stop adding broth. You may have some unused stock left.

Remove from heat; stir in 1/4 cup feta cheese, parsley, and Parmesan cheese. Spoon rice mixture into a serving bowl; top with 1/4 cup feta cheese and pepper.

Monday, July 12, 2010

Pizza on the Barbeque


I decided to try something new the other night. It had been stinking hot during the day, so I was reluctant to do anything in the kitchen that would further heat up the house. My children, who were not deterred by the heat, insisted that I make them pizza.

Feeling backed into a corner, I decided to finally try cooking pizza on the barbeque. I figured it would be the best of both worlds. My kids would get their pizza and I would be able to maintain the balmy but bearable temperature in my house.


I was not quite sure how to proceed, so I decided to crank one side of the grill to high and cook the pizza indirectly. I covered the other side with some foil and closed the cover until the barbeque was about 500 degrees (I think it was pretty close to that before I even turned it on).

I also decided to keep the pizzas small and the toppings simple so that it would be easier to get them on and off the grill. I chose San Marzano tomatoes crushed and mixed with a little fresh basil from my garden, olive oil, salt and pepper for the sauce with a little fresh mozzarella on the top.


The pizza turned out great. It was crisp and golden with a thin crust. It had a slight barbeque flavour that added a bit of smokiness to the cheese and tomato sauce. All in all it was relatively easy and worth doing especially if you are surrounded by small demanding people who will accept nothing less than pizza.


Pizza on the barbeque

fresh pizza dough of your choice
mozzarella cheese, grated 
4-5 San Marzano tomatoes, canned or fresh
2 tablespoons olive oil
salt and pepper to taste
10 basil leaves or to taste

Light barbeque and turn burner on one side to high. Line the unlit side with a couple of layers of aluminum foil. Close the cover and let grill preheat to about 500 degrees F.  The exact temperature is not that important it should just be very hot, in the 425 to 500 degree range.

While the grill is preheating roll the dough out in personal pizza size portions. A standard dough recipe should make enough for at least 4 small pizzas, rolled thin.  Place the rolled dough on a pizza peel dusted with cornmeal as this is how you will be moving the dressed dough to the barbeque.  If you do not have a pizza peel you can use a flat cookie sheet (without sides).

In a small bowl crush the tomatoes, using your hands or a knife.  It should be broken up but still chunky. Stir in the olive oil and salt and pepper.  Spread 2-3 tablespoons of the sauce on your prepared dough.  Tear 2 or 3 of the basil leaves and scatter them over the sauce.  Add the cheese.

Transfer the pizza to the foil covered side of the grill using a quick, but controlled back and forth shaking action to remove it from your peel or cookie sheet.  Close the cover and let it cook 15-20 minutes.  Check after 15 minutes.  The pizza is done when the crust is golden and the cheese is melted and brown.  Remove the pizza from the grill with your peel or cookie sheet and enjoy.

Thursday, July 8, 2010

Blueberry Custard Tart


I have a ridiculously long list of recipes I want to try. I think I must bookmark at least one a day and yet some of them never seem to get made. They just don’t light a spark in me, even though I like the look of them.

But this recipe was different. I saw it a couple of months ago and right away I new I had to try it. I bought blueberries at least half a dozen times with the intention of making it, but somehow something always seemed to get in the way.


But I couldn’t stop thinking about it. I don’t know what made it stick with me. Maybe it was because Andrea’s pictures looked so good and maybe it was because I liked the thought of blueberries and Cassis, but either way it stayed with me.

Then last week, my parents came for a visit and I knew that my moment had arrived. My mom loves pie and having 2 extra people around to help me eat it (more like save me from eating it all) cinched the deal.


It turned out to be a lot like the Rhubarb Cream Pie I made on Mother’s Day. The pâte brisée recipe was amazing. It came together so easily and made a lovely flaky, crisp crust. The filling was delicious, not too sweet with an intense blueberry flavour and just a hint of the Cassis. My mom loved it, I loved it, in fact everyone loved it. Now I just have to get to the rest of those recipes!


Blueberry Custard Tart
Adapted from Joanne Harris and Fran Warde's My French Kitchen via Cooking Books

Pastry:

1 3/4 cups flour
3/4 cup chilled butter, cubed
1 tablespoon sugar
1 large egg
1/2 tablespoon cold water


Filling:

1 lb blueberries, washed and picked over
3/4 cup heavy cream
2/3 cup sugar
2 large eggs
3 tablespoons flour
1 tablespoon Cassis

In a food processor, pulse the flour and butter cubes for about 15 seconds, until the mixture reaches the consistency of coarse crumbs. Add the eggs, sugar and water, and process again until the mixture starts to come together. This should take no more than 30 seconds.

Turn the dough out onto a lightly floured surface and quickly shape together into a ball. Wrap it in plastic or wax paper and let it rest in the refrigerator for about a half an hour.

After the half hour, roll out the dough on your floured surface and fit into a 9 inch tart pan with a removeable bottom.  You should roll out the dough so that it is thin enough that it will overhang the edge of your tart pan, about an 1/8 of an inch thick. Then cut off the excess by rolling your rollingpin over the top edge of the pan.

Preheat the oven to 400 degrees F. In a medium bowl, mix together the cream, sugar, eggs, flour and liqueur until the mixture is smooth. Sprinkle the washed and dried blueberries over the prepared crust. Pour the cream mixture over the berries. Lightly sprinkle the top with a bit of extra sugar. This will help the top brown during baking.

Bake for 35 minutes, until the crust is fully cooked and the cream is set. Allow to cool before serving.

Monday, July 5, 2010

Cherry Almond Bars


I mentioned a couple of weeks ago when I made Cherry, Almond Chocolate Chip Cookies that I have a thing for cherries and almonds.  Well, I wasn't kidding. Since I made those cookies I have had that combination constantly on my mind.  Then, when I found a bag of organic Ontario Cherries at the farmer's market, I knew what I had to do! I had to find a recipe that would bring these two loves together.


After strawberries, then next big "summer" crop for me is cherries.  I could eat bowl after bowl of them in one sitting.  When I was younger, we had a cherry tree in our backyard and I vividly remember standing under the tree just pulling cherries from the branches and eating them right there on the back lawn.  So when I saw the first baskets of the season at the market I snapped them up.

But then what to do with them?  I had already made the cookies, so I wanted to find something different.  I began my usual routine of fishing around on the internet when I came across this recipe from Smitten Kitchen. 


Now anyone who regularily visits Deb's beautiful site knows she has a thing for baked goods made with browned butter.  This is just the kind of recipe she loves, but I took one look at it and I thought, these bars could do with a little almond flavour.  I added some extract and ground almond to both the crust and the filling and they turned out perfect.  The filling was soft and buttery with a crisp shortbread crust and the pop of cherries in each bite was just what I wanted. Plus, they looked beautiful and I had plenty of cherries left for something else...like maybe cherry jam or cherry ice cream or cherry soda or cherry smoothies, hmm so many possibilities.


Cherry Almond Bars

adapted from Bon Appetit via Smitten Kitchen
for the crust:

7 tablespoons butter, melted
1/3 cup sugar
1/4 teaspoon vanilla extract
1/2 teaspoon almond extract
1/4 cup ground almonds
1 cup plus 1 tablespoon all purpose flour
pinch of salt


for the filling:

1/2 cup sugar
2 large eggs
pinch of salt
1/4 cup all purpose flour
2 tablespoons ground almonds
1/4 teaspoon vanilla extract
1/2 teaspoon alomnd extract
1/2 cup butter, diced
16 pitted sweet cherries

Preheat oven to 375°F. Line an 8 inch square pan with parchment paper, leaving some paper to hang over the sides.
In a small bowl mix melted butter, sugar, and vanilla. Add flour and salt and stir until combined. Transfer dough to the prepared pan, and press evenly across the bottom of the pan with your fingers. Bake until golden, about 18 minutes. It might puff slightly while baking. Remove from oven and cool the crust slightly on a baking rack while continuing with the filling. Keep oven at 375 degrees F.

For the filling, melt butter in heavy small saucepan. If you want to you can cook the butter until it is browned, about six minutes.  I omitted this step from Deb's recipe as I wanted to showcase the almond flavour.
Whisk sugar, eggs, and salt in medium bowl to blend. Add flour, ground almond, almond extract and vanilla. Whisk until smooth. Gradually add melted butter into sugar-egg mixture; whisk until well blended.

Arrange pitted cherries in bottom of cooled crust. Carefully pour the filling evenly over the fruit. Bake bars until filling is puffed and golden and tester inserted into center comes out clean, about 40 minutes. Cool bars completely in pan on rack.

Remove the cooled bars from the pan using the parchment paper and cut into squares.

Friday, July 2, 2010

Savoury Bread Pudding


I have a quick post about an easy recipe for you today. I made this Savoury Bread Pudding the other night as a means to avoid throwing out a stale loaf of garlic bread.


I have a bad habit of over-shopping when I am preparing for a dinner party. I worry that there won't be enough for everyone and I end up I buying way too much food. That is just the kind of thinking that led me to buy this loaf of artisan garlic bread which, to be honest, never even saw the light of day during my dinner party.


By the time I remembered it was sitting in my cupboard it was approaching the “hard as a brick” stage. Despite that, I was determined to do something with it. In the past I have made bread soup or a bread salad with leftover bread, but this time I wanted to do something different.

I had been in a little café earlier in the day and they had slices of raisin bread pudding for sale. This got me thinking that I should do a savoury version that I could serve with the barbequed chicken we were having for dinner. (Organic, pre-marinated flat chicken from Butcher By Nature, by the way. Delish!)


The recipe I used ended up being very much like the Strata recipe I posted way back when. For this version, I used lots of caramelized onions, fresh rosemary and Gruyere cheese. It came together quickly, baked up beautifully and we managed to finish off the entire thing in one sitting. Definitely a keeper. The next time you find yourself with stale bread I suggest you give this a try, you won’t be disappointed!


Savoury Bread Pudding with Gruyere and Rosemary
For this recipe you could use any combination of cheese and herbs that you like.  I used Gruyere and rosemary, but you could use thyme and Cheddar or chives and goat cheese, the possibilities are endless.

4 cups cubed stale garlic bread
2 tablespoons olive oil
2 medium onions, chopped

2 tablespoons minced fresh rosemary
1 cup shredded Gruyere
6 eggs, lightly beaten
1 cup heavy cream
1 cup  milk
1 teaspoon salt
1/2 teaspoon pepper

Preheat oven to 375 degrees F.  Butter the bottom and sides of a 9 inch baking pan.
In a fry pan over medium heat saute onions in the olive oil until caramelized and golden brown, about 15 minutes.  Add the rosemary and saute one minute more.
Pour the cubed bread into the baking pan. Add the onion and rosemary mixture and 1/2 of the cheese. Gently toss everything to combine.  Sprinkle the remaining cheese over the top.
In a small bowl beat together milk, cream, and eggs. Pour carefully over the bread. Some of the bread will stick out of the custard, but that is okay.
Bake for 1 hour, or until browned and a knife inserted in the middle comes out clean. Remove from oven and cool on a baking rack. Serve warm.

Next post:  Cherry Almond Bars
Related Posts Plugin for WordPress, Blogger...