Tuesday, August 31, 2010

Homemade Granola Bars


Next week is back to school and that means packing school snacks. Everyday…snacks. I’m sure I’m not the only parent who gets stressed out just thinking about doing this every day for the next 10 months. It’s no easy task coming up with a healthy option while still satisfying the daily whims of a 5 year old. Sad to say, but as the summer started to draw to a close the first thing I started to think about was…”Damn, I’m going to have to start preparing snacks again.” (Thank goodness I’m not at the lunch stage yet, I’m sure that’s even worse.)

It will come as no surprise that I am not a big fan of the pre-made snacks available at the grocery store. I have yet to understand the appeal of cheese that you can pull apart (and all of the individual wrapping makes me nuts) and I really don’t like the sugary granola bars and bear claws, etc, etc.


Last year I did struggle after awhile to come up with good snacks that my daughter would eat and that did not take forever to get together. She usually got some cheese and fruit or a homemade muffin or some cut up vegetables.  I'd be fine for a while and then I would run out of ideas.

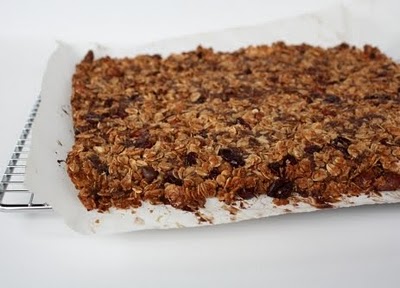
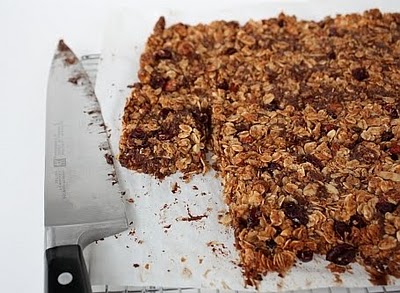
This year I’m back at work so I have even less time to get something together. That is why I am making an attempt to get organized up front. One of the things I did this week was make homemade granola bars. Now you may be saying, “Come on, that isn’t a quick snack solution”, but I promise you it is.

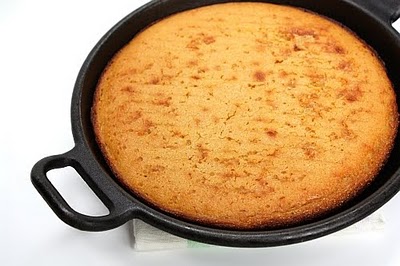
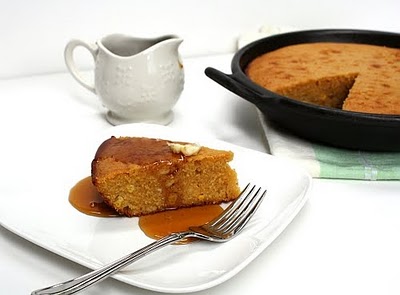
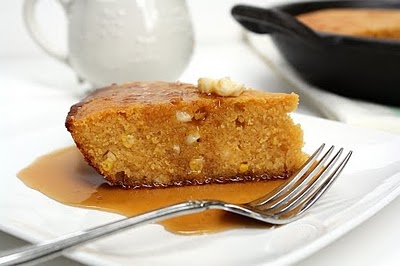
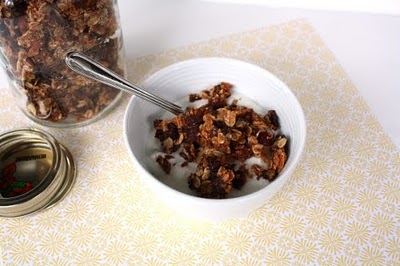
I can make a whole pan of them in about a half and hour and then after I cut them into bars I keep them in an airtight container in the fridge and they are good for weeks. You can make this recipe as either loose granola or you can cut it into bars.  If your school does not allow nut snacks (as most don't) then just omit the nuts and add seeds such as pumpkin, sunflower and sesame.  I add chocolate chips and dried cranberries to mine and the kids love them…so that’s a start. Now all I have to do is come up with something for the next 8 months.


Granola Bars

Adapted from Ina Garten

I have adapted the original recipe to suit my taste, which means I substituted maple syrup for the sugar, eliminated the oil and I added whole almonds and chocolate chips. Granola is pretty forgiving so you can change the recipe to suit your tastes as well.  Have fun with it.

2 cups old-fashioned oatmeal
1 cup almonds
1 cup shredded unsweetened coconut
1/2 cup toasted wheat germ
1/2 cup maple syrup
1/2 teaspoon pure vanilla extract
1 1/2 cup dried fruit, or a mix of dried fruit, nuts, chocolate, whatever you like (I used cranberries and chocolate chips)

Preheat your oven to 350°F.

Toss the oatmeal, almonds, and coconut together on a cookie sheet and bake for 10 to 12 minutes, stirring occasionally, until lightly browned. Transfer the mixture to a large mixing bowl and stir in the wheat germ. Reduce the oven temperature to 300°F. Line your cookie sheet with parchment paper

While the mixture is still warm, stir in the maple syrup and vanilla until the mixture is well coated. Add the cranberries and toss to combine.  Now add the chocolate chips and toss quickly as they will begin to melt.

Pour the mixture onto your prepared baking dish and press it down with you hand or a spatula. It may only cover half of the cookie sheet, which is fine, just make sure that the granola is pressed together well ( if you are going to make loose granola don't worry about this part).

Bake for 25 to 30 minutes, until light golden brown. Cool for 2 to 3 hours before cutting into squares.

You can store the bars in the freezer for a couple of weeks. They stay crisp this way, if you keep them at room temperature they will soften up.

Sunday, August 29, 2010

The Toronto FRESH Event


I am late with this post. I have been trying to write it for two days. As I have mentioned, I have spent the last three months organizing an event in the Toronto area. It was a two week series of workshops, dinners, tastings and classes which culminated in the Toronto premiere screening of the documentary Fresh last Thursday night.


Fresh is a new documentary by Ana Joanes that examines the consequences of our industrial food system and offers a practical alternative for how we grow, buy and eat our food. Some of the people featured in the film are urban farmer and activist, Will Allen, sustainable farmer and entrepreneur, Joel Salatin (made famous by Michael Pollan’s book, The Omnivore’s Dilemma) and supermarket owner, David Ball, who challenges our Walmart dominated society.

I wanted to write on Thursday night right after the screening, and then I tried again yesterday, but I am having a hard time. I am finding it hard to sum up the evening and the finale of the Toronto FRESH Event.


Was it a success? Yes! Did it meet my expectations? Yes and then some. I think the reason why I am having such a hard time is that once it was over I started to think about what should happen next.

The movie is only being distributed through grass-roots community driven initiatives with the intention of sparking local activity. Thursday's screening was followed by a panel discussion with some of Toronto’s leading food activists. The main topic of discussion was what could be done in our area to advance the cause for local, sustainable and accessible food resources. As you would expect, there was no easy answer, no single action that could satisfy that question. In fact, what struck me the most was how many different initiatives are underway and how they are all moving towards the same goal.

In attendance were urban farmers, community activists, teachers, chefs, city planners all looking at the issue from their own point of view. Possibly the most heartening aspect of this movement is that it can be advanced through so many different avenues, most likely because it affects so many different aspects of our society.


Food is not just fuel. Where it comes from, how it is produced, who can buy it and how it gets to your table impacts so many areas of our lives and our society. There are environmental, health-care, economic and social implications to our choices. No one person can tackle them all. For me the good news is that there are a lot of dedicated people in the Toronto area and a lot of initiatives already underway.

So then the question comes, where do I fit in to all of this and how do I keep active? I am so pleased I had a chance to screen this movie and be part of an event that provided a forum for discussion and communion but I want to figure out how to keep going.

Then my neighbour, Lindsay, came up to me yesterday. She had seen the film on Thursday and was clearly moved by the experience. She started to tell me what she had done already, how she had contacted friends and how she had made different choices when she went shopping the next day. She helped me to remember that small acts and individual choices can have a big impact.

Lindsay and I are continuing the discussion. We are looking at what we can do in our own neighbourhood, including things as simple as getting together with our neighbours over a meal and sharing the experience of good food.

So that is how I will start. I am committed to continuing with the larger advocacy groups and with the activists that I met in the course of organizing this event. But, I will also value the small changes that I can make at home and the power of actions I take right in my own neighbourhood and on my own street.

If you want to host a screening in your own area contact the people at freshthemovie.com. At the very least I think you will be amazed by the power of food to bring people together, to spark discussion and build community bonds. It is a very rewarding experience to be a part of something like that.

Tuesday, August 24, 2010

Cornbread


I had a really busy weekend.  I have been working a lot and working weekends so I have not had a lot of time to bake. When I had this weekend off I decided to make up for lost time. I made homemade gnocchi, homemade granola, scallion pancakes, an amazing steak sandwich and cornbread. 

When I sat down to do this post I thought what, out of all of those great recipes, am I going to share tonight?  I decided on the Cornbread.  Now, you may think out of all of my choices that this is the most mundane offering but I say au contraire


This Cornbread is just a beautiful cake, real comfort food.  That's actually why I made it.  I woke up Saturday morning planning to do all of this cooking and baking but first I wanted something comforting for breakfast.  When I was little my mother would make Cornbread and we would eat it hot out of the oven drenched in butter and maple syrup.  That's what I felt like having to start my day... something warm that reminded me of home, of being a kid, of mom in the kitchen. 


The recipe I use is very simple. It is made in a cast iron pan which gives the cake a nice crisp outside with a moist and dense centre, perfect for a good dousing of maple syrup.  Of course that is not the only way you can eat it.  I make it for chili and I add cheese and jalapenos or I make it to go with pea soup or stew.  You can even split it and use it to make Strawberry Shortcake. It works so many different ways, but if you haven't tried it with maple syrup then make that a priority. Because then you will have an idea of what home feels like to me. 


Cornbread
This recipe is from Michael Smith's Chef at Home series

½ cup butter

1½ cups milk
1½ cups coarse cornmeal
½ cup brown sugar
3 large eggs
1 teaspoon baking powder
¼ teaspoon salt
1 teaspoon vegetable oil for greasing the skillet

Preheat oven to 400 degrees. Place an 8-inch cast iron skillet in the oven to preheat.

Combine the butter, milk, cornmeal and brown sugar in a small saucepan. Bring to a slow, steady simmer over medium heat and whisk for a few minutes until thickened. Remove from heat and let cool slightly while you prepare the rest of the ingredients.
Add eggs, baking powder and salt to a medium bowl and whisk lightly. Add to the cornmeal mixture and stir until well combined.
Oil cast iron skillet and pour in batter. Bake for 20-25 minutes until the cornbread is golden around the edges and cooked through.
Remove from oven and cool on a baking rack for 10 minutes.  Turn the cornbread out onto a platter and serve in wedges while still warm.

Friday, August 20, 2010

Burnt Sugar Cake


I’m staring at the pictures of this cake and I am trying to think of something to write. I want to give you some insight into the cake making process or give you a reason why you should make this cake, but it all seems so unnecessary. I mean look at it. I just don’t know what to say. Do you really need a reason?

Burnt Sugar Cake. I just can’t think of anything that sounds better than that. I love the smell of caramelizing sugar, that sweet burnt smell, it is just intoxicating. So imagine a cake made from caramelized sugar syrup. It is over the top decadent.


In fact, believe it or not, I had to tone down the richness of the cake (and the burnt sugar icing) with a chocolate ganache glaze. (Honestly, it needed the bitterness of the chocolate to cut down on the richness of the caramel flavour…I’m not just making up an excuse to add chocolate.)

I have seen this cake pop up on a number of sites but the original recipe comes from Nancie McDermott’s Southern Cakes. This cookbook is full of amazing cakes, but this one it probably my favourite. It is a dense moist cake and the flavour really stands out. It is so much better than a basic white cake. So take a good look and then make it yourself, you will not be disappointed.


Burnt Sugar Cake

from Nancie McDermott's Southern Cakes

for the caramel syrup:
 
1 cup sugar
1 cup boiling water

Heat the sugar in a heavy skillet over a medium-low heat until the sugar melts into a clear brown caramel syrup. Resist the urge to stir until the sugar has begun to melt.  Watch carefully as the sugar can quickly change from deep brown to burnt. Gradually add the boiling water, pouring it down the sides of the pan. Be very careful as it will bubble up.
Cook, stirring constantly, until the water combines with the syrup and becomes a deep brown. Remove from the heat and set aside to cool. You will end up with about 1 3/4 cups of caramel syrup.


for the cake:

3 cups all purpose flour
1 tbsp baking powder
½ tsp salt
1 tsp vanilla extract
1 cup milk
1 cup butter
1¾ cups sugar
4 eggs
½ cup Caramel Syrup

Preheat the oven to 350F. Grease two nine inch cake pans and line the bottom with parchment paper. Grease the paper again and dust lightly with flour.
In a medium bowl, whisk together the flour, baking powder and salt. Set aside. In a separate small bowl stir the vanilla into the milk.
With your stand mixer or with an electric beater, beat the butter and the sugar at high speed for 2 - 3 minutes, until soft and fluffy.


Add the eggs, one at a time, beating well between each addition. Pour in half a cup of the caramel syrup and beat well. Add a third of the flour mixture and about half of the milk, beating at a low speed, until just incorporated. Mix in another third of the flour and the rest of the milk. Finally, add the remaining flour.
Divide the batter between your prepared pans. Bake for 20 to 25 minutes until the cakes are golden brown and begin to pull away from the sides of the pan. Let the cakes cool in the pans on a wire rack for 15 minutes. Turn out the cakes into the wire rack to cool completely.


Caramel Icing

3¾ cups confectioners sugar
½ cup Caramel Syrup
¼ cup butter
1 tsp vanilla extract
2 - 4 tablespoons milk

Combine the confectioners sugar, the caramel syrup, butter, and vanilla. Beat at medium speed for 2 to 3 minutes, scraping down the bowl. Add 2 tablespoons of milk and continue beating until the frosting is smooth and easy to spread. Add a little more sugar if it is thin, and a little more milk if it is too thick.

Chocolate Ganache

1/2 cup heavy cream
4 ounces bittersweet chocolate, chopped
1/2 tablespoon light corn syrup

Place the chopped chocolate and corn syrup in a small bowl. Bring the heavy cream to a boil. Remove from heat and add pour over the chocolate and light corn syrup. Whisk until smooth.
To assemble the cake:

Place once layer on a cake plate.  Spread with a layer of the caramel frosting and a little of the ganache.  Place the second layer on top. Spread the top with a layer of the caramel icing and pour the ganache over the top so that it runs down the sides.

Tuesday, August 17, 2010

Potato Salad...a new way


Most times I find that simple is better, especially when you are cooking with fresh produce.

For as long as I can remember I have been eating and making the traditional Potato Salad. I have used essentially the same recipe for more years that I care to contemplate. Sure, sometimes I mix it up, I add pickles or dill or eggs, but in the end this salad always involves a heavy dose of mayonnaise and a laundry list of other ingredients…mustard, spices, onions, and on and on.


But recently my neighbor and good friend, Treva, introduced me to a new way to make Potato Salad. This is a recipe passed down from her mother-in-law, which is the way most of the best recipes circulate, from friend to friend, relation to relation.

It is so easy to make that it hardly feels like any effort at all. Just steam some potatoes and then when they are still warm toss them with plenty of olive oil, vinegar and salt and pepper. When the potatoes have cooled toss in a good handful of chopped green onion. That’s it.

I especially like this recipe because instead of mayonnaise I taste potatoes, spring onions, and a lovely light vinaigrette. You could add fresh herbs…parsley would be good, as would or dill or basil, but I like it the way it is.

I’m sure I will make the traditional salad again, some day, but for now I am sticking with simple and delicious.


Potato and Green Onion Salad

1 lb of small new potatoes
1/4 cup good olive oil
3 tablespoons white wine vinegar
1/2 cup sliced green onions
salt and pepper to taste

Steam your potatoes until they are tender.
Move to a medium sized bowl and toss with the olive oil and vinegar. Season with salt and pepper to taste. Once they have cooled toss in the sliced onions and serve.  This salad is great room temperature or cold.  If you make it a day in advance the dressing has a chance to absorb into the potatoes. 

Thursday, August 12, 2010

Butter Tarts


I made something quintessentially Canadian tonight.  I made Butter Tarts.
I was going through my recipe box trying to think of something to make for this evenings post when I came across my recipe.  I haven't made Butter Tarts for a while so they caught my attention. 

Truth be told, my very favourite ones come from my uncle's bakeshop. But as that is a 2 hour drive, I decided to make these instead.


Don't get me wrong, these are good, really good. The reason why I like my uncle's better is that he has a special machine that he uses to stamp out the dough nice and thin.  Try as I might, I can never get my pastry as thin and for me a good butter tart is all about the filling.

But I was glad to have these when dessert time came around and believe me no one else was complaining either. The filling in these tarts is perfect, smooth and rich with a good hit of maple flavour. If you cook them just to the 18 minute mark the filling stays runny which is, in my mind, the best way to have a Butter Tart. And if you are Canadian then you know by saying that I have just waded into the great Butter Tart debate...runny filling or not, but lets not get into that now. Let's just have another tart.


Butter Tarts

for the filling:

1/2 cup room temperature butter
1 cup brown sugar
1/2 cup corn syrup
1/2 cup maple syrup
2 eggs
1 teaspoon vanilla
a few drops of lemon juice
pinch of salt


for the pastry:


1-1/4 cups all-purpose flour
1/4 teaspoon salt
1/3 cup shortening
4-5 tablespoons ice cold water

Preheat the oven to 375 degrees. Make the pastry first. In a small bowl mix the flour and salt. Cut in the shortening with a fork or a pastry cutter until the mixture resembles coarse crumbs. Add the cold water and stir just until the dough starts to pull together.

Turn out onto a well floured surface. Quickly shape into a ball and roll out to a 1/4 inch thickness. Cut into 4 inch circles and fit the cut pastry into the cups of a muffin tin.
In a medium bowl cream together all of the filling ingredients until smooth.  Fill the prepared cups 2/3 full. Bake for 18-20 minutes. Remove from oven and cool on a wire rack for 10 minutes.  Remove from muffin tin and let stand until completely cool.

Butter on Foodista

Tuesday, August 10, 2010

Fried Zucchini Blossoms


Do you remember this picture? It is the zucchini plant I showed you a couple of weeks ago, the one that is taking over my front yard. Well, as it turns out, while I have been anxiously awaiting my first zucchini, I have been missing out on the bounty that this plant has been providing for weeks now. Namely these…


Zucchini blossoms. For years I have heard how good they are, but I have never had the chance to try them (they are not easy to come by at the grocery store). So when my zucchini plant started to blossom I...ignored them...it didn't really cross my mind to do anything with them.

Then the other day one of my work colleagues was munching on fried zucchini flowers during lunch. She let me try one and it was good, but as it was a cold leftover I was not overwhelmed. When I told her my zucchini plant was full of blossoms but I hadn't thought to do anything with them she was appalled (really she was, I thought it was kind of a strong reaction, but now I see why).

So, shamed, I went home and picked the flowers. I dutifully found a recipe and made them. They were good...so good! Honestly, one of the best things I have had in a long time.  The batter was nice and crisp and the cheese filling was great but the flowers, they were amazing.  It is hard to describe until you taste them.  They are soft and delicate, as you would expect a flower to be, but still distinctive and flavourful. I'm hooked. 

When I came home from work today I eyed my zucchini plant, willing it to produce just a few more of these gems...I don't want to think I have let the whole season go by with just one taste. 


Pan-fried Zucchini Flowers
adapted from Food and Style


for the batter

1 cup flour
1/2 teaspoon sea salt
3/4 cup warm water
1 large egg
1/4 cup beer


for the stuffing

1 egg, lightly beaten
1/2 cup fresh ricotta cheese
1 small shallot, finely chopped
1 tablespoon finely chopped herbs (Use whatever combination you like.  I used Italian parsley, thyme and oregano)
1/4 teaspoon sea salt
freshly ground pepper to taste
10-15 fresh zucchini flowers
1/2 cup olive oil for pan-frying
Mix the flour, salt and warm water in a small bowl. This is your batter. It should sit for at least a half an hour to rest, so set it aside while you prepare the flowers and stuffing.
In a second small bowl mix the egg, ricotta, shallot, herbs, salt and pepper until well blended and set aside.
To prepare the flowers - gently make a slit lengthwise in each flower and remove the stamen. Spoon a small amount of the stuffing (about 1 teaspoon) into the base of each flower and gently twist the petals so that the stuffing is held inside the flower. Place on a baking rack.
Once all of the flowers are prepared, add the egg and the beer to your batter.  Mix until smooth.
Heat a large heavy-bottom skillet to high heat. Add the oil. When the oil is hot, dip each flower in the batter and add them to the pan. Sauté for 2 to 3 minutes until golden. Flip the flowers and continue to sauté for 1 to 2 minutes until golden. Repeat until all flowers have been used, reducing the heat to medium-high when the pan is very hot so the oil doesn’t burn. Serve immediately.

Friday, August 6, 2010

Black Bean Quesadillas


I have another quick dinner idea for you. Quesadillas. This is probably one of the quickest and easiest dinners I make on busy week nights. It takes about 20 minutes from start to finish and it is a family affair getting it ready.  My husband grates the cheese while my daughters help with the assembly.  Five quick minutes in a frying pan to melt the cheese and voila, dinner.  Add a salad or some rice and...even better dinner!


I introduced my children to Tex-Mex food early on because a) it is usually a quick dinner option, b) it is always kid friendly and c) I have a real weakness for Mexican food. I am very partial to spicy foods and I am always happy to eat anything that includes salsa and sour cream (terrible, I know). This fits the bill on all accounts and the possibilities are endless.  Add leftover chicken or shrimp, a little steak or just as it is.  I get mild salsa for my girls and extra jalapenos for me.  Plus, in the summertime nothing goes better with a cold beer!

These Black Bean Quesadillas are my vegetarian version.  I fry a few onions, garlic and peppers with some chili powder.  Then I spread some refried black beans on a tortilla, add the sauteed vegetables and some cheese.  If you want them spicy use a spicy chili powder or add the jalapenos to the sauteed vegetables.  Serve with a little sour cream and the salsa of your choice.


Black Bean Quesadillas

10 small flour tortillas
2 tablespoons olive oil
1 large onion, sliced
1 red or green pepper, seeded and sliced
2 cloves of garlic minced
1 tablespoon of chili powder
salt and pepper to taste
1 cup old cheddar cheese, grated
1 16 ounce can refried black beans
salsa of your choice
sour cream

Grate the cheese into a small bowl. Set aside.
In a frying pan over medium heat saute the sliced onions, peppers and garlic in one tablespoon of olive oil. When the onions are translucent add the chili powder and salt and pepper. Continue to saute for one minute more.  Remove from heat.
Grease a clean frying pan with a little of the remaining olive oil.  Spread one tortilla with about 2 tablespoons of the refried black beans.  Add 2-3 tablespoons of the sauteed vegetables and a sprinkling of the grated cheese. Place a second tortilla on top.  Place the quesadilla in the frying pan over medium heat. Cook for 2-4 minutes until browned and crisp.  Flip over and do the same on the second side.  Remove from the pan and cut into wedges.  Continue to the process with the remaining tortillas.  Serve warm with a scoop of salsa and sour cream.

Monday, August 2, 2010

Getting Fresh


Do you know what that first picture is? It is a picture of the zucchini plant that is currently taking over my front flower bed. And this is a picture of the climbing cherry tomato plant that is scaling the side of my house.


My children stand in front of it plucking off tomatoes like it is a giant green vending machine. I would show you a picture of the strawberry plants, but they have been decimated by my two voracious locusts…nothing left!

I also planted rhubarb and blueberries and every herb I could get my hand on. This is just the kind of experience I remember from my childhood...fresh food right in my own backyard. The desire to have my children experience the pleasure of growing and eating their own fruits and vegetables is what prompted me to plant this garden…and create this website. Both came from a desire to connect with others through food.


I have been thinking about food and all of the ramifications of the choices we make when we eat. I am convinced that the childhood memories I treasure are the key to how I want to connect, and how I want my children to connect, with food. But then I found that it went even further.


It’s funny how small personal decisions can lead to much bigger things. Ultimately my personal household decision led me to organize The Toronto FRESH Event.

I came across the trailer for FRESH while surfing the internet. I thought it spoke very eloquently to the values that I have attempted to live and write about over these last few months. It seemed the perfect focal point for my efforts to advocate for local and sustainable food.  So I embarked upon this journey (with the help of my very good friend and neighbour) to create an event that would highlight some of the local and sustainable resources we have available to us right here in Toronto.

The good news is we have a wealth of resources and the even better news is that we have a wealth of people dedicated to producing, growing, creating and choosing these resources.  My hope is that the Toronto FRESH Event will help to spread awareness and possibly inspire others to discover their own connection with local and sustainable food.

The Event runs for the last two weeks of August and includes a series of dinners, tastings and workshops and will culminate in a screening of FRESH the movie on August 26th.  If you are in the Toronto area I encourage you to come and experience FRESH in Toronto. 


And if you cannot make it, here is a recipe for a Zucchini, Feta and Mint Tart. Perfect for a light summer meal. Fresh, green and delicious it may inspire you to plant a garden, share with friends or just take a moment to consider all of the wonderful food we could have available right outside our door...


Zucchini, Feta and Mint Tart
adapted from the Summer 2008 issue of Food and Drink Magazine

2 tablespoons butter
3 medium zucchinis, sliced into 1/4 inch rounds
2 medium onions, sliced
1 teaspoon chopped garlic
2 tablespoons chopped mint
Salt and freshly ground pepper
2 large eggs
¾ cup half and half cream
1/2 cup feta cheese, crumbled


Single Crust Pastry Recipe

1-1/4 cups all-purpose flour
1/4 teaspoon salt
1/3 cup shortening
4-5 tablespoons ice cold water


Preheat oven to 400 degrees.
Make the pastry first. In a small bowl mix the flour and salt. Cut in the shortening with a fork or a pastry cutter until the mixture resembles coarse crumbs.  Add the cold water and stir just until the dough starts to pull together. 
Turn out onto a well floured surface.  Quickly shape into a ball and roll out to a 1/4 inch thickness. Line a 9 inch tart pan with the pastry.  Trim off the excess and prick the surface all over with a fork. 
Bake for 20 minutes or just until it starts to brown. Remove from oven and set aside.

Reduce the oven to 350 degrees.
Melt butter in a frying pan over medium heat. Add zucchini, onions and garlic. Sauté for 3 minutes or until beginning to soften. Turn heat to medium-high and continue to cook for 1 minute or until zucchini is just cooked through and juices have evaporated. Remove pan from heat, stir in mint, season with salt and pepper to taste, and set aside.
In a small bowl beat eggs and cream. Sprinkle feta cheese over prepared tart shell. Add the zucchini mixture and carefully pour the egg and cream mixture over top .
Place tart on a baking sheet and bake for 30 to 35 minutes or until set and lightly golden. Let cool for 10 minutes before serving.
Related Posts Plugin for WordPress, Blogger...