Monday, May 31, 2010

A FRESH idea


It has been just over 4 months now since I started this blog. It is incredible how much can happen in such a short time. I have met some really amazing people, both in my home city and across the world, thanks to the miracle of the web. As well, thanks to this site I have had a chance to participate in and write about a number of wonderful events, like the hospital benefit dinner. I have volunteered at the Toronto chapter of SlowFood, I have become a contributor at Foodwhirl and I have had an interview at Look and Taste. All pretty amazing for just 4 months time.

But now, I have something to tell you about that I find incredibly exciting. A while ago, quite by accident I stumbled upon the website for a movie called FRESH. It is a documentary, produced and directed by Ana Joanes, which examines the cost of our industrial food system and offers a practical alternative for how we grow, buy and eat our food. Some of the main characters featured in the film are urban farmer and activist, Will Allen, sustainable farmer and entrepreneur, Joel Salatin (made famous by Michael Pollan’s book, The Omnivore’s Dilemma) and supermarket owner, David Ball, who challenges the Wal-Mart dominated economy.


I was very excited by the subject matter as it is something near and dear to my heart. As the mother of two young girls I am concerned about where and how our food originates and the consequences our current food system is having on our health and the environment. I also believe people are losing a sense of where their food comes from and I am very determined to ensure my children do not lose that connection.

So I sent an inquiry through the website asking if they planned to release the movie in Toronto. Much to my surprise, Ana Joanes responded to my e-mail. She said she would be delighted to include Toronto as part of their theatrical release, if I was willing to organize the event.

Needless to say, I said yes. I have spent the last two months organizing the event, which will include panel discussions, workshops and farm to table dinners. I am so thrilled to be part of bringing this film to Toronto.

The movie is only being distributed through community driven, grass-root initiative like this, which I think is very empowering for the communities involved. The intention is to raise awareness of local food resources and to inspire people to action. To quote from Ana's letter on her website: "FRESH is more than a movie, it’s a gateway to action. Our aim is to help grow FRESH food, ideas, and become active participants in an exciting, vibrant, and fast-growing movement".

You can find out about community screenings in your area through the FRESH website.


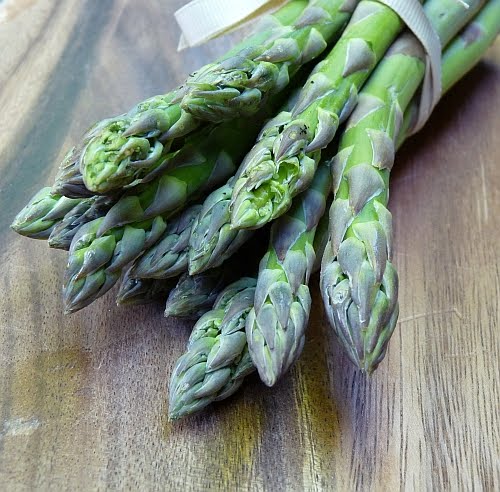
And now, because I always include a recipe in my posts, I want to show a simple and quick use for asparagus. What could be fresher than local asparagus, one of the first crops of the season.

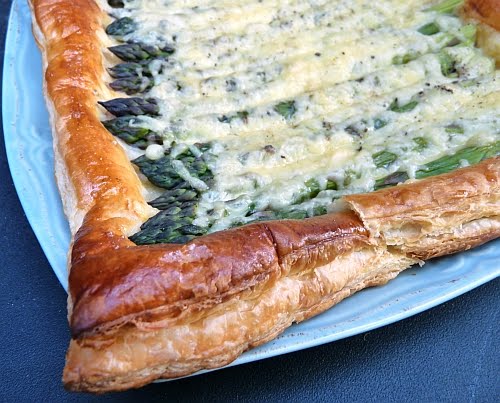
This is a recipe for an Asparagus and Gruyere tart.  It is really just fresh asparagus arranged over puff pastry with a bit of dijon and gruyere.  It is ready in a half and hour and it is so simple and delcious.  You can eat it either as a side or as a main with a tossed salad.  I was thinking you could also change it up a bit and add an egg on top or a bit of proscuitto.


Asparagus and Gruyere Tart
adapted from Canadian Living Magazine

1 bunch asparagus, washed and trimmed

1pkg all butter puff pastry, thawed
1 tbsp Dijon mustard
1/2 cup shredded Gruyère cheese
1/4 cup grated parmesan
1/2 tsp pepper
1 egg
1 tbsp water

Line a baking sheet with parchment paper or a silicone mat. Set aside. Pre-heat the oven to 450 degrees with the rack at the centre position.
Steam the prepared asparagus until tender-crisp about 2-3 minutes. Place immediately in an ice water bath to stop the cooking process and then pat dry.
Unroll the pastry sheet onto prepared pan. Spread evenly with mustard, leaving a 1-inch border. Arrange asparagus, side by side on mustard and sprinkle with cheeses and pepper.
In small bowl, beat egg and water and lightly brush the mixture over pastry border. Bake until puffed and golden and cheese is bubbly about 18 minutes. This dish is good warm or cold.


Next post: Spicy Hot Chocolate

Thursday, May 27, 2010

Strawberry Freezer Jam and a new gig: contributor at Foodwhirl!


I went to the Green Barn Farmer’s Market, this past weekend on a mission. I needed to find something inspiring for a guest article on Foodwhirl.

I have been visiting the site for sometime. It is a great resource for interesting recipes as well as for cooking tutorials and shopping and entertaining advice. They have featured some of my recipes in their "Spotlight" section so last week I decided to approach Nancy, the editor, and offer my services as a guest contributor. Happily, she said yes.


So I headed off to the market with the intention of finding something that would serve as the muse for my first article. Once there, I had a nice surprise: I found fresh local strawberries. I wanted something suitable for a summer themed recipe, so I was on the hunt for asparagus or rhubarb or some interesting salad greens. I never expected to find strawberries, but there they were, about three weeks ahead of schedule.

They smelled and looked wonderful, so I knew I had found my muse. I took them home and made a batch of Strawberry Freezer Jam. What could be more summery than that? Bright red, full of strawberry flavour, perfect on toast, with scones or as a sauce for vanilla ice cream, strawberry jam is the best of summer in a jar. You can find the full article and recipe here.


Later, I took the biscuits from my last post and some of my new jam and I made Strawberry Shortcake! What could be easier or better than fresh strawberry slices, strawberry jam and whipped cream. Delish!


Next post:  Asparagus and Gruyere Tart

Monday, May 24, 2010

Whole Wheat Buttermilk Biscuits


I am becoming a regular at farmer’s markets around the city. There are so many great markets in Toronto and they are all a little bit different. My new favourite is the one at the Wychwood Barns at St. Clair and Christie.


I found it by accident when I was up there on another errand a few weeks ago. Since then I have been back a couple of times. It is a really unique market located on the site of an old streetcar terminal. The building is still there, reinvented as an art centre and used to house the market in the winter months. The market itself is run by a community food centre called The Stop.

In the warmer months the vendors are outside, ranged around the west and south sides of the building. There is a great variety of booths selling everything from fresh produce to baked goods to empanadas to coffee. There is music playing and a great playground on the east side of the building, so the kids really enjoy being there as well.


This past weekend I was amazed by the choice of local produce already available. I found Ontario strawberries (more on them in another post) and I found a very unique product; Red Fife Wheat Flour.


Red Fife Wheat is an heirloom variety that was first introduced into Canada in 1842 near Peterborough Ontario (which is not far from Campbellford, where my Grandfather’s bakeshop is located). I was familiar with the name and a bit of its history. There is a museum up there devoted to Red Fife Wheat and you can’t help but know a little bit about it if you live in that area.

I was very surprised to find the flour at the market and I stopped and spoke to Ed who was selling it (along with some very delicious crackers that go by the name of Evelyn’s Crackers). He explained that this variety of wheat was almost extinct, but the crop is now being revived. His flour, which I ended up buying, came from a farm in Madoc, another town in the Peterborough area.

I was anxious to try it, so I headed home with my treasure. I wanted something that would showcase the flavour of the flour so I went with my go-to biscuit recipe and I substituted in 1 cup of the Red Fife Wheat flour.


In truth, I really did not expect the flour to be much different from the whole wheat flours I have used in the past. It turned out I was wrong. The flour was very soft and delicate and my biscuit dough handled beautifully. But the best part was the taste. It had a wonderful whole wheat flavour that was milder and sweeter than my usual brand.

I served the biscuits with some strawberry jam (remember those strawberries I found), and they quickly disappeared. I have to say, it was fun to bake with an ingredient that is part of Ontaro's history. It was like making a link to the past. It is not often you experience something like that, but I am beginning to discover that there are all kinds of surprises to be found at the farmer's market.


Red Fife Wheat Buttermilk Biscuits
adapted from the Better Homes and Gardens Cookbook
If you want to make them without using whole wheat flour, the original recipe calls for 2 cups of all purpose flour.

1 cup whole wheat flour
1 cup all purpose flour
1 tablespoon baking powder
4 teaspoons sugar
1/2 teaspoon cream of tartar
1/4 teaspoon baking soda
1/4 teaspoon salt
1/2 cup cold butter
3/4 cup buttermilk
additional milk for glaze
demerara sugar (optional)

Preheat the oven to 450 degrees. Line a baking sheet with parchment or a silicone mat.
Mix all dry ingredients together in a medium bowl.  Cut or rub the butter into the dry ingredients until the mixture resembles course crumbs. Add the buttermilk and stir together with a fork until just combined. 
Liberally dust a work surface with flour and knead the dough for 10 to 12 strokes to bring it together into a smooth ball.  Roll or press flat to 1/2 inch thickness and cut out biscuits with a 2 inch round biscuit cutter.
Transfer cut biscuits to the cookie sheet and brush tops with milk. If desired, sprinkle the top with a small amount of demerara sugar. 
Bake in the centre of the oven for 10 to 12 minutes or until the biscuits are lightly browned. Cool on a baking rack. Serve with butter and jam.


Next post: Strawberry Freezer Jam and Strawberry Shortcake

Friday, May 21, 2010

Date Nut Loaf


Just the other day I found myself wanting to make Lemon Coffee Cake again. I had tried it a couple of weeks ago and I really liked it but I wanted to try a few tweaks to the recipe. I started mixing everything together, only to discover I had just one egg. It was not enough for the coffee cake but my little shopping oversight led me to make something I hadn’t made in years.

I was feeling too lazy to run to the store, so I started to flip through my recipe cards to look for something that only needed one egg. That’s when I came across my mother’s recipe for Date Nut Loaf.


It was a complete reversal, from light and citrusy lemon bread to the dark rich taste of dates and walnuts but in the end I was glad my lack of planning led me in that direction. Making that recipe was a trip down memory lane. I remember being in the kitchen of my childhood home, eating this bread hot out of the oven. My mom would spread my slice with butter and it was pure decadence.  I have always liked the combination of a dark, nutty bread with the rich, intensely sweet flavour of dates and this bread perfectly captures that balance.

I eventually got some more eggs and finished up the Lemon Coffee Cake, so we have been working our way through light and dark all week. I think between the two I have preferred the dark mostly because I loved rediscovering an old favourite. For me it’s a bit like going home, being a kid again. That’s my idea of comfort food.


Date Nut Loaf

1 cup chopped dates
1/2 cup brown sugar
1/4 cup butter
3/4 cup boiling water
1 egg
1 1/4 cup all-purpose flour
1/2 cup whole wheat flour
1 teaspoon baking soda
1/2 teaspoon salt
1/2 cup chopped walnuts

Preheat the oven to 350 degrees Fahrenheit. Position your oven rack to the centre of the oven. Grease and flour a 9 inch loaf pan.
Place the chopped dates, brown sugar and butter into a medium bowl.  Pour the boiling water over top of these ingredients and set aside.
In a small bowl whisk together the flours, baking soda and salt.
Stir the date, sugar and butter mixture just until the butter is melted and the sugar is dissolved.  Once the date mixture has cooled to room temperature add in the egg and mix until combined. Add in the dry ingredients and stir just until combined. Lightly toss in the chopped walnuts, mixing just until they are distributed throughout the batter, being careful not to over mix.
Pour the batter into the prepared loaf pan and bake for 40-50 minutes or until the bread is a deep golden brown and a toothpick inserted near the centre come out clean. 
Remove from oven and cool on a baking rack.  After 5 minutes loosen the edges of the bread from the pan and remove it by inverting the pan onto the baking rack. Cool completely before serving, if you can wait that long.

Monday, May 17, 2010

Garden Pasta with Ricotta


It is amazing what creatures of habit we can be. I am always on the lookout for new recipes and I love trying new things but it seems at the end of the day I am pretty predicable. 

I mentioned, when I posted the recipe for Zucchini and Wild Leek Fritters that I crave them every year about the same time. Well, this recipe for Garden Pasta with Ricotta falls into the same category. I don’t know what triggers the need for this dish, but every year, without having thought about it for 6-9 months, I all of a sudden find myself furiously thumbing through my recipe cards looking for it.


This time, however, I am pretty confident that I was tipped in that direction by the basket of organic fava beans I found at The Sweet Potato supermarket. I was surprised to see them so early but I didn't waste much time thinking about it. I snapped up a big bag of them and headed right home to search through my recipe cards.

This is the kind of meal I like this time of year. It's light and fresh, quick and easy and lets the natural flavours of the ingredients shine through. Plus I love, love, love recipes that include lots of fresh herbs, particularly mint.

I used to be mad for basil but now I adore mint. I find it more complex and a bit unexpected in savoury dishes. I add it to all kinds of things from yoghurt dip to curries to moroccan stews. I have a really amazing salad recipe that calls for a ton of mint, but I’ll save that for another day.

For now I am going to focus on this pasta. Fava beans can be a bit of a pain. You have to remove them from the pod, blanch them and then remove the tough outer skin from each bean. This dish is worth the effort and after that the work is pretty much done. Just boil some pasta and toss the ingredients together. Then pour a glass of crisp white wine and enjoy the taste of summer in a bowl!


Garden Pasta with Ricotta
This recipe originally came from a pull-out recipe card I got inside of a Martha Stewart Living Magazine
 
1 pound fresh fava beans, shelled
1 pound fresh or frozen peas, shelled
1 pound pasta (I used spaghetti)
1 cup ricotta cheese
1/2 cup grated Parmesan cheese
1/4 cup coarsely chopped mint leaves, plus more leaves for garnish
zest of 1/2 lemon
2 tablespoons extra-virgin olive oil
salt and pepper to taste

Fill a large pot with well salted water and bring it to a boil. In a large bowl, prepare an ice-water bath. Place the shelled fava beans into the boiling water. Let it return to a boil, about 1 minute and then blanch beans 1 minute more. Remove beans from the water with a slotted spoon and place in the ice-water bath. Peel and discard tough skins; set beans aside.
Using the same water, blanch peas about 2 minutes or until just tender and bright green. Remove from water with a slotted spoon and place peas in ice-water bath. Drain, and set aside.
Fill your pot with fresh well salted water and bring to a boil. Add the pasta of your choice and cook until al dente. Reserve 1 cup of pasta water and then drain pasta.
In a large bowl, combine ricotta, parmesan, lemon zest and mint, Add cooked pasta, fava beans, peas and pasta water. Toss to combine. Add salt and pepper to taste. Drizzle with olive oil. Sprinkle with additional mint.


Next post:  Date Walnut Loaf

Saturday, May 15, 2010

White Bean Spread and the Hospital Benefit Dinner at last!

Last weekend was the benefit dinner for the Campbellford Memorial Hospital Foundation. I mentioned this event when I posted the recipe for the Orange Cheesecake that turned out to be the dessert we served that evening.


I felt very fortunate to be part of the team that put together the dinner for this year’s event. This was the second year that my uncle Peter (who owns and operates Dooher’s Bakery, formerly my grandfather’s shop) took on the challenge of creating and preparing the menu. The meal was seven courses and most of the ingredients were sourced from local suppliers. It is amazing what you can find right in your own backyard. There are so many great food producers in Ontario it is a wonder sometimes that we look to find our food from anywhere else.


We had a charcuterie platter that included pâté made by one of the members of the kitchen team, a raw ewe milk cheese produced by a local farmer and a very flavourful wild leek sausage that came from a local butcher. We even included a dish of homemade dill pickles that were donated by one of the team member’s grandmothers. 


We served a wild mushroom soup made with mushrooms provided by a local supplier and for dinner we had bison tenderloin that came from a local bison farm. And finally the cheesecake, of course, was made fresh in my uncle’s shop and I had the task of making 12 batches of the Orange Caramel sauce. My kitchen has never smelled as good as it did that night. I felt like I was surrounded by a cloud of caramelized sugar.
Overall it was two very long and tiring days prepping, cooking and plating for close to 150 attendees but it was a very rewarding experience. My uncle was a great leader and a lot of fun to be with in the kitchen. Everything turned out beautifully and best of all we raised a considerable sum that will go towards the purchase of a CT Scanner for the hospital.

For this post I am including a recipe for White Bean Spread. In the course of planning the meal there was a period where we tested many recipes before we decided on the final menu. At one point we considered including this spread as part of the charcuterie plate.
We eventually decided to go without it but I wanted to pass on the recipe because it was so good and easy to make. I found this a nice change from Hummus. It seemed lighter and the garlic and thyme really worked well with the mild creaminess of the white beans. I made it once with roasted garlic and once with regular garlic and it was great both ways. The roasted garlic added a subtle sweetness while the regular garlic gave the spread a nice bite.


White Bean Spread
This is from my personal recipe box.  You can use canned white beans or you can cook dried beans according to the directions on the package and go from there.  If I start with dried beans I add thyme and garlic to the boiling water to up the flavour of the dip.
 
1 lb or 2 cans of cooked white beans
2 tablespoons fresh thyme
2 tablespoons extra virgin olive oil
4-5 cloves of roasted garlic or 1-2 cloves of fresh
1/4 cup water, or as needed to reach the desired consistency
salt and pepper to taste
 
In a food processor, finely chop the garlic.  Add the white beans and thyme.  Turn on the processor and add the olive oil through the feed shoot.  Add the 1/4 cup of water slowly.  Once the dip looks to be the consistency you want, stop adding the water.  You may find you do not need the full 1/4 cup.  Stir in salt and pepper to taste.  Serve with crackers, pita bread or cut vegetables.  This spread is also very nice in a sandwich with roast vegetables.


Next post: Ricotta, Fava Bean and Mint Pasta

Tuesday, May 11, 2010

Lemon Coffee Cake


I made a lovely lemon bread the other day.  It was light and fresh with a bright citrus flavour.  I had seen the recipe a while ago on Leite's Culinaria and I bookmarked it, where it became one in a long list of recipes I wanted to try.  I probably have about 2 full pages of recipes that fall under that category. 

But then, a couple of days ago something made me go back to that list and pull out the recipe.  It may have had something to do with the lovely organic lemons I found at my local grocery store, but I think it was just the recent burst of warm weather that made me feel like making something, well, sunny. 


Now the weather has turned cold again, and it is supposed to rain for the next few days.  Even so, I have some amazing pictures that I took when it seemed like summer around here and I have a new recipe for lemon bread.


This is a yeast bread, so it does take a pretty large time commitment, but it is worth it.  The dough does not need a lot of work. Just mix it, let it rise and roll it out, so as yeast breads go, it is pretty easy.  The recipe could easily be changed into orange or even cinnamon bread.


Lemon Pull-apart Coffee Cake
adapted from Baking for All Occasions by Flo Braker via Leite's Culinaria

Dough

2 3/4 cups flour
1/4 cup sugar
1 package instant yeast
1/2 teaspoon salt
1/3 cup milk
2 ounces unsalted butter
1/4 cup water
1 1/2 teaspoons pure vanilla extract
2 large eggs, at room temperature


Lemon filling

1/2 cup sugar
3 tablespoons finely grated lemon zest
1 tablespoon finely grated orange zest
1/4 cup butter, melted


Cream cheese icing

3 ounces cream cheese, softened
1/3 cup powdered sugar
1 tablespoon milk
1 tablespoon fresh lemon juice
Make the dough


In the bowl of a stand mixer, fitted with the paddle attachment, stir together 2 cups of the flour, the sugar, the yeast, and the salt and set aside. Heat the milk and butter in a small pan over low heat just until the butter is melted. Remove from the heat, add the water, and set aside until warm or about 120 to 130°F.
Add the vanilla extract and pour the milk mixture over the flour-yeast mixture. Mix on low speed until the dry ingredients are evenly moistened. Add the eggs, one at a time, mixing after each addition just until incorporated. Stop the mixer, add 1/2 cup of the remaining flour, and resume mixing on low speed until the dough is smooth, 30 to 45 seconds. Add 2 more tablespoons flour and mix on medium speed until the dough is smooth, soft, and slightly sticky, about 45 seconds.
Remove the dough from the bowl and quickly form into a ball. Sprinkle a work surface with a small amount of flour. Knead gently until smooth and no longer sticky, about 1 minute. You can add additional flour if needed, but try not to use more that 2 tablespoons.
 Place the dough in a large lightly greased bowl. Cover the bowl securely with plastic wrap, and let the dough rise in a warm place until doubled in size, 45 to 60 minutes. The dough is ready for the next step when you can press your finger lightly into the surface and the indentation remains.

Lemon Filling.

Make the paste while the dough is rising.  In a small bowl, mix together the sugar and both zests. Set aside.  The mixture will appear dry at first but the sugar will draw moisture from the zest making a wet paste.


Assembling the Cake

Lightly butter a 9-by-5-by-3-inch loaf pan.
Punch the dough down. Remove from the bowl and on a lightly floured surface, roll it out the dough into a 20-by-12-inch rectangle. Using a pastry brush, spread the 1/4 cup of melted butter over the dough. Be generous with the butter, but you may not need it all. Using a pizza cutter or a sharp knife, cut the dough crosswise into 5 strips, each about 12 by 4 inches. Sprinkle 1 1/2 tablespoons of the sugar/zest mixture over one of the buttered rectangles. Top with a second rectangle and sprinkle it with 1 1/2 tablespoons of the sugar mixture. Repeat with the remaining dough sugar mixture, ending with a stack of 5 rectangles.
Slice the stack crosswise through the 5 layers to create 6 equal strips, each about 4 by 2 inches. Fit these layered strips into the prepared loaf pan, cut edges up and side by side. Do not worry if it does not fit exactly into your pan.  The dough will spread to fill the space as it rises and bakes.  If it is tight lengthwise that is fine. Loosely cover the pan with plastic wrap and let the dough rise in a warm place until puffy and almost doubled in size, 30 to 50 minutes. During the last 20 minutes of the second rise, center a rack in the oven and preheat the oven to 350°F.
Bake the coffee cake until the top is golden brown, 30 to 35 minutes. Transfer to a wire rack and let cool in the pan for 10 to 15 minutes.


Cream Cheese Icing

In a small bowl, mix the cream cheese and sugar until smooth. Beat in the milk and lemon juice until the mixture is creamy and smooth. The mixture should be a little runny.
While still warm, remove the coffee cake from the pan, loosening the sides with a spatula and invert on a baking rack
Place a piece of waxed paper under the rack to catch any drips from the icing. Pour the icing mixture over the cake, letting it drip down the sides. Serve warm or at room temperature.
 
 
Next post:  White Bean Spread


Friday, May 7, 2010

Rhubarb Cream Pie and a few words about my mom


The other day my mother called me and said, "I was looking at your website and I think you should do a recipe about rhubarb."  That is so like my mom, always one step ahead of me.  Since I began this project I have been thinking that I should do a rhubarb recipe. But I began in February and it was hard to come by.  So I have been waiting and waiting and finally last week I found my first rhubarb at the farmer's market. Practically the moment it hit my fridge, mom called with a recipe for Rhubarb Cream Pie.


I talk a lot about my grandfather and my memories working with him at his bakeshop. But honestly, I would not have had the capacity to appreciate that experience without my mom. She was and is an amazing cook. Growing up, I don't think I realized all of the effort and care she took in feeding her family. She made almost everything from scratch and she was very adventurous.  At a time when most people had never even tried them we were eating curries and stirfrys on a regular basis.


Like so many things, I only came to realize the full impact of what she did for us until much later in life. Now that I am a mother I think about this all of the time.  I am trying to instill in my children the same respect for the value of food and I keep going back to what I learned from my mother. She taught me not only to love food but to love what goes with it, the family connections and the memories that stay with you for the rest of your life. And I realize that it was just one of the many ways that she expressed her love and care.


So I took her rhubarb pie recipe and I told her I would make it. I knew it would be good, but I also knew it would give me another opportunity I have been looking for, to tell her thanks.

As for the pie, it was great. It had a smooth and creamy custard base with the right balance of tartness from the rhubarb and spiciness from the nutmeg.  I recommend making it for your mom, I bet she'd love it!  Happy Mother's Day!


Rhubarb Cream Pie
this is a very old recipe out an early edition of the Better Homes and Gardens Cookbook.  It is not available in the newer editions.

4 cups rhubarb, sliced in 1 inch pieces
1 1/2 cups sugar
1/4 cup flour
3 eggs
1 teaspoon vanilla
1/2 teaspoon nutmeg
1/8 teaspoon salt
 pastry for single crust pie

for the pastry:

1 1/4 cups flour
1/3 cup shortening
4 to 5 tablespoons cold water

In a medium bowl, stir together the flour and salt. Cut in the shortening until the mixture resembles course crumbs. Sprinkle 4 tablespoons of cold water over the mixture and stir together with a fork until just combined. Do not over mix or your pastry will be tough.  If it is not coming together add another tablespoon of water. Turn the pastry out onto a well floured surface and shape quickly and lightly into a ball. Sprinkle the top with additional flour and roll to a quarter inch thickness. Carefully fit the rolled pastry into a 9 inch pie plate, being careful not to stretch it. Trim off any excess from the edge. Set aside while you prepare the filling.


for the filling:

In a medium bowl combine the eggs, sugar, flour, vanilla, salt and nutmeg. Stir to combine.  Stir in your sliced rhubarb and mix until coated with the egg mixture.  Pour the filling into your prepared crust.  Bake at 375 degrees F. for 45-50 minutes or until the filling is set.  If you notice the top is becoming too brown lightly place a layer of foil over the top while it bakes. Remove from oven and cool on a baking rack. Serve as is or with a little vanilla ice cream.


Next post:  Lemon Pull-apart Loaf

Wednesday, May 5, 2010

Wild Leek Buttermilk Biscuits and a trip to St Lawrence Market


Last weekend I got the family up early and we headed down to St Lawrence Market. Up until a couple of years ago we lived just north of the Market so we were there almost every weekend. But then we moved to the west end of the city and our trips have become less frequent.

It’s always been one of my favourite places in the city so I try to get there as often as I can. It is a huge market complex that takes up both the south and north corners of  Front Street at Jarvis. The south building is the main market, with an incredible array of vendors selling everything from baked goods, to meats, to kitchen supplies, to caviar.

The north building is the farmers' market where local producers bring in the best of the season.  It is a very vibrant space, especially this time of year. It is amazing what you can find even in April, when you expect nothing to be available so early in the growing season. But last weekend there was the first asparagus and rhubarb


brussels sprouts and peppers


onions and black radish (which I had never tried, but turned out to be very nice)


and of course, wild leeks.


As those of you who saw my Zucchini and Wild Leek Fritters post know, I am mad for wild leeks. Last year I was very cautious with them, as I had never had them before and I didn't really know what to do with them.

This year I have been using them with abandon. I put them in a tofu stir-fry, I added them to my pasta sauce and I made a really nice pan of roast vegetables that included wild leeks, fiddleheads and brussels sprouts. It was a clean out the fridge measure that turned out to be a fantastic combination that I will definitely do again.


And I made Wild Leek Buttermilk Biscuits. I came across a picture of these biscuits while I was looking for recipes and I was intrigued.  It was such an unexpected use for wild leeks and I loved the idea of adding coriander seed so I followed the link and found this lovely blog...Klutzy Chef. The recipe originally came from the April 2009 issue of Bon Appetit.


They were very good biscuits. I often find biscuits can get dry after a few hours but even though I made these in the morning they were still really moist at dinner. And they were so flavourful and the addition of the crushed coriander seed was such a nice compliment to the savoury flavour of the leeks. This recipe is a keeper and when wild leeks are no longer available I know I will be making them with spring onions or roast garlic, or any other number of combinations. I reduced the salt a little bit and I added a bit more coriander, but otherwise kept to the original recipe.


Wild Leek Buttermilk Biscuits
adapted from Bon Appetit via Klutzy Chef
 
3/4 cup chilled buttermilk

3/4 cup thinly sliced trimmed ramps (bulbs, stems, and green tops)
1 1/2 cups all purpose flour
2 teaspoons baking powder
1/2 teaspoon salt
1/4 teaspoon ground black pepper
6 tablespoons (3/4 stick) chilled unsalted butter, cut into pieces
1 large egg, beaten to blend (for egg wash)
1 teaspoon coriander seeds, cracked

Preheat oven to 425°F. Line a baking sheet with a silicone mat or parchment paper. In a medium bowl, mix flour, baking powder, salt, and pepper. Add butter pieces and work into the flour mixture until it begins to clump together and the texture resembles small peas. Add the sliced wild leeks and toss to combine. Add buttermilk and stir just until the dough comes together. Do not over work or the biscuits will be tough. Turn dough out onto lightly floured work surface and roll out to a round, about 1/2 inch thick. Using 2-inch-diameter biscuit cutter dipped in flour, cut out your biscuits. Gather dough scraps together and roll out again to 1/2-inch thickness and cut out additional rounds. Transfer the biscuits to your prepared baking sheet. Brush biscuit tops with the egg wash. Sprinkle with cracked coriander seeds. Bake biscuits in the centre of your oven until golden brown, about 20 minutes. Cool on rack. Serve warm or at room temperature.


Next post: Rhubarb Custard Pie and Dufferin Grove Farmers' Market

Monday, May 3, 2010

Banana Cream Pie


This post is for my husband. My husband is devoted to Banana Cream Pie. It is far and away his favourite dessert, over chocolate in any form.

When I met him I seriously questioned whether I could make a lifelong commitment to someone who is only mildly interested in chocolate. He baffled me when he told me he did not like chocolate ice cream and his attitude towards chocolate cake is lukewarm. Seriously, it bothers me to this day.


But, I have come to accept this about him and being a good wife, I try to support him. On one occasion I remember we had heard about this little restaurant that was tucked away in some small Ontario town that apparently had the best Banana Cream Pie.

The place was near my Grandparent’s house so when we were there for a visit I decided we should find this restaurant so that hubby could try the pie. We drove around little country roads for what seemed like forever, getting lost and making wrong turns, but finally we found the place only to find that they were sold out (must have been really good pie to be sold out in such an out of the way location). Hubby had to settle for Coconut Cream Pie, a very distant second place.The place is gone now so we never did get to try it.


But the good news is, I make a pretty good Banana Cream Pie and I make it just the way he likes it, with a graham cracker crust and whipped cream instead of meringue. It’s really a simple dessert to make and truth be told I do like it quite a bit. I find it cool and rich, kind of like ice cream and I really can’t fault anything that includes whipped cream.

The last time I made it I dressed it up a bit for a dinner party, so I used a tart form. Normally I would use a regular pie plate so that the slices are thicker. It's a very simple recipe to put together and you can change it up anyway you like.  Sometimes I put a layer of chocolate sauce or caramel sauce on the crust before I pour the pudding over top and sometimes I just put banana slices. Either way it is delicious.


Banana Cream Pie

for the crust:

1 1/2 cups crushed graham crackers
1/4 cup sugar
1/3 cup butter, melted

In a small bowl, stir together the melted butter, sugar and graham cracker crumbs until the crumbs are moistened and the mixture begins to clump together.  Pour the mixture into the bottom of your pie plate and, using your hand, press the crumb mixture to evenly coat the bottom of the pan and up the sides. Set aside.

for the pudding:

3/4 cup sugar
1/4 cup cornstarch
3 cups milk
4 egg yolks
1 tablespoon butter
1 teaspoon vanilla
1 teaspoon banana extract
1-2 bananas sliced

In a medium saucepan, combine sugar and cornstarch.  Stir in the milk. Cook over medium high heat, stirring constantly until the mixture is thickened and bubbly. Reduce heat to medium low and cook and stir 2 - 3 minutes more. Remove from heat. 
In a small bowl, lightly beat your egg yolks.  Whisking constantly, slowly add 1 cup of your warm milk mixture.  This will temper the yolks to bring them slowly up to the temperature of the milk so that you do not create scrambled eggs.  Return the yolk and milk mixture to the remaining milk mixture in your saucepan. Cook and stir over medium low heat for 2 - 3 minutes more to thicken the pudding.  Remove from heat and stir in the vanilla, banana extract and tablespoon of butter. If desired, you can strain the pudding through a fine sieve to ensure it is smooth and there is no cooked egg in the mixture.

Assemble the pie:

Cover the bottom of your prepared crust with the banana slices and pour the pudding over top.  Smooth the top with a spatula and cover with plastic wrap.  Place in the fridge for 6-8 hours to allow the pudding to set and the pie to cool completely. You can prepare the pie the night before if you wish.


Whipped Cream:

1/2 cup whipping cream
2 tablespoons sugar
1 teaspoon vanilla.

In a stand mixer, on high speed, beat the cream with the whisk attachment until soft peaks form.  Add the sugar and vanilla and beat about 1 minute more until firm peaks form.  Right before serving the pie, spread the top with the whipped cream and garnish with banana slices and a few graham cracker crumbs. Enjoy!

*** I've had a few questions about the banana extract and I just wanted to add a note about it.  It is not necessary to the recipe, it just boosts the banana flavour a bit.  It can be hard to find, but if you are looking for it, you can find it in some grocery stores, specialty food stores or you can order it on line here.

***I have also had a question about the pudding setting up.  It is important to cook the pudding until it is quite thick before you take it off the stove, just be careful to keep stirring so that the bottom does not burn. If you are worried that it will not be thick enough you can always add an extra tablespoon of cornstarch.  Dissolve it in 2 tablespoons of cold milk and add the mixture to the thickened pudding. Return it to the stove and simmer 2 minutes more or until it has reached the desired consistency.

Next Post:  A trip to the St Lawrence Market and Buttermilk Wild Leek Biscuits
Related Posts Plugin for WordPress, Blogger...