Friday, February 25, 2011

Scallion Pancakes


I am working on simplicity right now. Trying to pare things down so that only what is important to me is left. Sounds like a straightforward task, but, boy, simplicity is not so easy to come by. It's about shutting out the noise and all the little things that pull you in a million different directions and focusing on what matters most. So I am in the process of getting there.

You know what else; I am discovering that simplicity is a group effort. It has become a major topic of conversation between my husband and me. How to get there, what it means, what to let go of and what to keep. The good news is we seem to be on the same page (which means he will stay in the keep pile!)

And why? Well, because wonderful things can come from very simple beginnings. You keep what is best and discard what is just taking time and energy with no return.  And no, I am not just talking about possessions but also about how I spend my days and what I focus on.


I am discovering that this is a philosophy that works well both in life and in cooking. These Scallion Pancakes are a perfect example. Crisp, delicate, salty and flavourful; these little pancakes are simplicity at its best.

I had seen a few different versions in my travels through the internet. I thought they looked interesting, but they did not every really capture my attention until I saw Ellie's beautiful looking pancakes on Almost Bourdain.


They are easy to make and take no time to cook. And in the end you have a nice little bite, perfect as a starter or a little nibble with cocktails. What more could you ask for?

Scallion Pancakes Recipe
Adapted from Almost Bourdain
Makes 2 servings

1 3/4 cups all-purpose flour plus extra for dusting
1/2 tsp salt
1/2 cup warm water
2-3 spring onions, sliced very fine
1/4 cup vegetable oil
coarse salt
soya for dipping

Sift flour and salt into a big bowl and stir to combine. Make a well in the middle and add the warm water. Using your hands mix together to form a smooth dough. Cover with cling wrap and let it rest for 30 minutes.
Next, divide the dough into 2 equal parts.Working with one portion at a time, place the dough on a lightly floured surface. Roll out to a circle, trying to roll as thin as possible.  Generously brush with vegetable oil.


Sprinkle the dough with half of the chopped spring onion. (Ellie used just the greens from the onions but I wanted a stronger flavour, so I used some of the white part and I made sure I sliced it very fine.)


Starting with the edge closest to you, roll up the dough and pinch the ends to seal in the onion and oil.


Lightly flatten and then roll it into a coil, pinching the end to seal it. Now roll out the coil into a circle.


This process of rolling into a cigar shape and then wrapping into a spiral and rolling out again creates light flaky layers when you cook the pancake, so do not shortcut.

Heat a non-stick frying pan over medium heat with a tbsp of vegetable oil. Cook the pancake for 3-4 minutes on each side, turning once, until it is crisp and golden brown.


Sprinkle with a little coarse salt, cut into wedges and serve immediately.  You can use a little soya for dipping if you like. Enjoy!

Saturday, February 19, 2011

Program Note

Radishes and Rhubarb is now radishesandrhubarb.com.  That's right, I got rid of the "blogspot" in the url address. Rest assured, everything else will stay the same, just needed a little simplification. Thanks for reading and a new post will be up soon!

Monday, February 14, 2011

French Apple Tart


After I had my daughter I made the decision to buy organic as much as possible.  It is amazing what having a baby can do to your thought process.  I had always been a very particular eater, and felt I was very choosy about my purchases, but once I had a new little person depending on me I began to examine what I was eating even more closely. I suppose it is a rather sad fact of life, but the things that you put up with for yourself you would not allow for your child. And so it was that I began to demand organic food at my table, food that was not laden with chemicals, pesticides, herbicides, hormones, antibiotics, etc, etc, etc.


Now, I will be honest, organic products are not always easy to find and often they are prohibitively expensive.  While choice and price has improved dramatically over the last few years there is still a long way to go.  That is something that consumer pressure and the need for organic producers to be competitive will continue to improve. Until then, I think what you buy and eat becomes a matter of personal priority.  I have switched entirely to organic meat(when we eat meat, which is much less that before), dairy and eggs.  To me, buying organic meat, dairy and eggs has a tremendous impact on the quality of animal care, the environment and our health. 

When it comes to produce, I use the dirty dozen list as a guide. As for the other items on my grocery list,  I try to buy seasonal and organic as much as possible.


So, being a mom led me down this path and this path has led me to other great things as well.  For one, I met a lovely woman by the name of Tanmayo while organizing the FRESH Event last year.  She is the Chair of the Toronto Chapter of the Canadian Organic Growers Association. COG, as they are called, is a great resource for anyone who wants to switch to organic.  They are very active with local retailers, they have workshops and gardening seminars and they provide a list of resources available in the Toronto Area. 

This Saturday is their annual conference and I was honoured to be asked to moderate one of the panel discussions. Our panel will discuss the power of mothers to force change and improve things for the better.  If you are in the Toronto area I encourage you to come down.  I think it will be a very interesting and informative day.


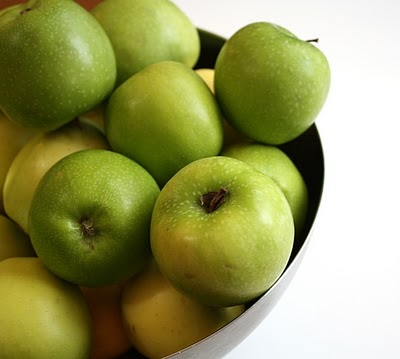
In the meantime, I have a simple and delicious French Apple Tart to share with you.  I made this, of course, with organic Granny Smith apples.  It is subtle and elegant; a real show stopper. I found the recipe on Crumpets and Cakes.  It is from the Barefoot Contessa, which is not a surprise because Ina Garten consistently turns out amazing recipes. I am sure this will become a favourite for you as well.


French Apple Tart
adapted from The Barefoot Contessa, Back to Basics

6 Granny Smith apples, peeled cored and sliced thin
1/2 cup sugar
1/2 cup warm sieved apricot jam 
2 tablespoons Calvados (apple brandy) or apple juice

Pastry
2 cups all-purpose flour
1/2 teaspoon kosher salt
1 tablespoon sugar
2/3 cup vegetable shortening
6 - 7 tablespoons ice water

For the pastry, place the flour, salt, and sugar in a medium bowl. Cut in the shortening with a fork or a pastry cutter until the mixture resembles coarse crumbs. Add the cold water and stir just until the dough starts to pull together. Turn out onto a well floured surface. Quickly shape into a ball wrap in plastic and refrigerate for at least 1 hour.

Preheat the oven to 400 degrees F. Line a sheet pan with parchment paper.On a well floured surface, roll the dough slightly larger than 10 by 14-inches. Place the dough on the prepared sheet pan and trim the edges. Refrigerate while you prepare the apples. Place overlapping slices of apples diagonally down the middle of the tart and continue making diagonal rows until the pastry is covered with apple slices.


Sprinkle with 1/2 cup of sugar. Bake for 45 minutes to 1 hour, until the pastry is browned and the edges of the apples start to brown. Rotate the pan once during cooking. While the tart is baking, heat the apricot jelly together with the Calvados and run through a fine sieve. Brush the apples and the pastry completely with the jelly mixture. Loosen the tart with a metal spatula so it doesn't stick to the paper. Allow to cool and serve warm or at room temperature

Tuesday, February 8, 2011

Whole Wheat Bread


Hi there, I want you to read something:

"When the girl returned, some hours later, she carried a tray, with a cup of fragrant tea steaming on it; and a plate piled up with very hot buttered toast, cut thick, very brown on both sides, with the butter running through the holes in it in great golden drops, like honey from the honeycomb. The smell of that buttered toast simply talked to Toad, and with no uncertain voice; talked of warm kitchens, of breakfasts on bright frosty mornings, of cosy parlour firesides on winter evenings, when one’s ramble was over and slippered feet were propped on the fender, of the purring of contented cats, and the twitter of sleepy canaries."

Isn't that lovely.  It is a passage from one of my favourite childhood stories, The Wind in the Willows by Kenneth Grahame.  Doesn't it beautifully evoke that scene; warm tea, fresh bread and melting butter.  And I know what you are thinking now, "I want toast." Me too. Lucky for you I just made some.


I was re-reading the book last week and when I got to that passage I immediately wanted fresh bread. Not just any bread, mind you, no flimsy slices pulled from a plastic bag but fresh, homemade bread; the kind that can stand up to a thick slathering of butter.  But bread takes hours and hours to make, so what to do?


Well, as it turns out that is not always the case. I have a great recipe that makes two lovely dense loaves of bread in just over an hour. That's right, just over an hour from mixing bowl to thick slice of warm bread covered in melted butter. I came upon this recipe by accident. I was looking for a no knead recipe and I stumbled upon this Easy Bread recipe on a site called The Heart of New England. It is simple to do and turns out perfect every time.  You can change it up, make white bread, brown bread, raisin bread...whatever you like. 


Easy bread
from The Heart of New England

5-6 cups all-purpose flour, (I used 1 cup of whole wheat flour (Red Fife Wheat, to be exact) and all-purpose unbleached for the rest.)
2 tablespoons of dry yeast
2 tablespoons brown sugar
1 tablespoon salt
2 cups hot water (120-130 degrees F.)
A cake pan of hot water

Mix 3 cups of the flour with the yeast, sugar and salt. Pour in the hot water and beat for 100 strokes (or 3 minutes with a mixer). Stir in the remaining flour until the dough loses its stickiness. You may not need all 6 cups, just add enough flour, a cup at a time, until the dough is no longer sticky. Turn onto a well floured surface. Knead for 8 minutes. 

A note about kneading: I think this is the part about making bread that intimidates a lot of people .  It is quite simple, once you get the hang of it. Flatten the dough slightly by pressing down with the palm of your hand, then fold in half and push away from you with the heel of your hand.  Turn the dough a quarter turn and repeat.  Keep doing this for 8 minutes until the dough is smooth and elastic.  Add a little flour as you knead if the dough is sticky.

Place dough in a lightly greased bowl and cover with a warm damp cloth. Let rise for 15 minutes in a warm spot (I use my oven.  I turn it on for about 30 seconds and then turn it off right away, then I leave the bowl of dough in there to rise).

Punch the dough down and divide into two pieces. Shape into two round loaves and place on a greased baking sheet. Cut an "X" one-half inch deep in each of the loaves with a wet sharp knife.

Place baking sheet with loaves in the middle of a COLD oven. Place a pan of hot water on the lowest shelf(this will help to create steam in the oven which will give your bread a crisp crust). Heat the oven to 400 degrees and bake 30-40 minutes or until golden brown. You can tell your bread is done when you tap your finger on the top crust and it sounds hollow.

Remove from the oven and let cool.  Slice thick, toast it or not,  and spread with butter, jam or whatever you like. Enjoy

Wednesday, February 2, 2011

Snow Day


A Snow Day, what a treat.  A chance to slow down, spend the day with my children and forget about all of the pressing responsibilities that make life feel so hectic.  I always struggle with the fact that there is just never enough time so it was nice to have a day to relax and enjoy being together. 

My children seemed to like the break too.  You forget how hectic life can be for them as well. Childcare, school, activities, playdates.  It's just go, go,go.  I think once in awhile they need a little break; a chance to just be and do whatever they want.


So what to do on a day like this?  Well, it definitely calls for a warm bowl of stew. Curried Lamb and Chickpea Stew to be exact. Nothing could be simpler.  Just a few ingredients thrown in a pot and then left to do its thing for a few hours. At the end of it you have a warm, fragrant bowl of stew and a day well spent with the people who matter most.


This recipe is an amalgam of a few different ideas. It has become a staple in the house when I want something warm and satisfying. Best of all, it requires very little effort. Serve it with crusty bread and you have the perfect end to a cold winter day.  Now excuse me I am being called.  We are playing "school" and I am the teacher.


Curried Lamb and Chickpea Stew

1 1/2 lbs of stewing lamb, cut into 1 inch chunks
2 onions, peeled and chopped
2-3 garlic cloves, minced
1 tablespoon grated fresh ginger
2 tablespoons olive oil
1 medium can chickpeas
1/4 cup vindaloo paste (such as Pataks) (Vindaloo paste comes in a number of varieties from mild to hot)
3 cups beef stock
1 small can of tomato paste
2 tablespoons red wine vinegar
1 teaspoon dijon mustard
1/2 teaspoon cumin
2 bay leaves
salt and pepper to taste

In a large dutch oven, brown the meat in the olive oil over medium high heat.  Add the onions, garlic and ginger. Cook a few minutes more until the onions are translucent.  Add the remaining ingredients and stir to combine. Bring to a boil then reduce the heat and simmer 11/2 to 2 hours until the meat is tender and the sauce has thickened.  Serve with crust bread.
Related Posts Plugin for WordPress, Blogger...